Datacolor Spyder 4 Software Download Mac Updated
Datacolor Spyder 4 Software Download Mac
Finding the Universe contains affiliate links, meaning if you make a purchase through these links, we may earn a commission at no extra cost to you.
Monitor scale is an important task for photographers. A properly calibrated monitor will accurately show you the colors in your images, and then when you share or print them, you have washed everything you lot can to ensure the final photo is seen equally you lot intended.
Nevertheless it is a job that many people don't do, or start and so give upwardly on. This is for a number of reasons.
Offset, and perchance the major reason, is that color calibration and color management is a complex topic with a lot of terminology. As a result, it can be very easy to get lost in the details when trying to configure your own monitor, and to stop upward with bad results. Trust me, I accept been down this road.
Next, at that place is a huge variability in the quality of displays available on the marketplace, and the technology that powers these displays. As a result, tips and advice that work on i monitor might not work on another.
Finally, there is a big difference when it comes to the ambient lighting conditions in the places we work. Different light situations result in our eyes perceiving colors differently, making monitor scale challenging, even for those of us with great vision.
Every bit a result, many users don't bother to calibrate their monitors correctly. Or, they might attempt, become lost in a world of conflicting communication and complex terminology, and requite upwards. I have definitely been one of those people in the past.
However, if you want the images y'all are producing to be as accurate to life as possible, and so color management is something y'all are going to have to become on top of. To help out, I've put together this guide that covers how to calibrate a monitor, too as an caption of some of the terminology involved.
I will preface this mail with the argument that monitor calibration and color management is a complicated topic. If you practice a search for how to calibrate your monitor online, you lot volition unearth thousands of web pages and forum posts discussing the topic of monitor calibration.
I will attempt to go along this guide as easy to follow every bit possible. As a result, there may be some simplification. The goal of this post is to help people go more accurate images, rather than trying to cover the entire topic of color management. Let's get started.
Table of Contents
What is Colour Management and Monitor Calibration?
Let's commencement await at what colour management and calibration actually are.
Your monitor or screen likely has some controls that let yous change how it looks. This will use for any of your devices, whether it is your desktop computer monitor, laptop screen, smartphone device, tablet, or external monitor.
The controls will vary depending on the type of screen, but in general they will allow to y'all change things similar the brightness of the screen, and possibly other things like the saturation and contrast.
The controls on an external monitor volition likely be like to those you might find on a Idiot box, and are usually accessed via a button. No doubt yous are enlightened that yous can alter things like dissimilarity, brightness and color on your TV, and this changes how the image looks. This is the same for a computer monitor, and to some extent, other device screens.
In that location are also other ways yous can control how your screen looks. These settings are normally configured and controlled through the operating arrangement on your device, which might be Windows, iOS, Android, or Linux. Adjusting these settings is known as color management. Basically, yous are adjusting how dissimilar colors appear on your screen.
The operating system reads the color management setup on your calculator, and instructs the graphics processing chip inside your computer to send specific instructions to the brandish. The brandish then renders the colors, adjusting the saturation, color intensity, and brightness accordingly.
Generally, calibrating your monitor and color management are 2 tasks that get paw in hand, and the terms are frequently used interchangeably. The end goal is the same, to get your monitor to accurately display colors.
Why Do You Need To Calibrate Your Display?
You might exist wondering why y'all need to calibrate your monitor or brandish.
Well, the main reason is for consistency. Allow's think of a photo for a moment. If a monitor is correctly calibrated, when y'all wait at the photo y'all took on the screen, it should match adequately closely to what the scene looked like when yous took the photo.
Once you lot edit the photo, of class it volition likely look unlike to the original, depending on the adjustments you lot make. However, when you come to share your image, either digitally or physically, you desire to be certain that what other people run across matches the image on your screen.
If you programme on printing your images, then having a correctly calibrated monitor is particularly important, so you lot know that the printed prototype will wait as information technology does on your screen. It tin be very disappointing to spend time editing an paradigm and observe out that the printed effect doesn't match what y'all see on screen.
If you are selling your photos, mayhap as a wedding photographer, mural lensman or event photographer, having print images that match how they look on screen is critical. The person buying the shot volition want what they buy to lucifer your vision.
For sharing to the web, or other digital mediums, color direction is yet of import, although mayhap not quite so much. The reason for this is that you lot tin't control other people's screens. If your screen is set up correctly, simply someone else has their saturation set to a high level for example, your image will appear more saturated to them.
However, in reality all you lot can do is configure things correctly on your end, and that is the most you can do. If someone else has an incorrectly configured display, that is up to them to ready.
If y'all correctly configure your display or displays, then your image should look the same on all of them, and when y'all print it, it will besides look the same.
Now, for a lot of people this may not be very important. If you are a hobbyist photographer or blogger that mainly looks at and share your photos online, you may not care very much. But if you are someone who prints a lot of photos or if you lot desire to sell your photos, so monitor calibration and colour direction are much more of import.
I would yet say that if you program to go serious about your photography, starting out with a properly calibrated monitor is a adept thought.
Colour Management Terminology
Before diving into the details of how to calibrate your screen, I want to cover some terminology that you volition meet when it comes to display technology and color management.
I will try non to get too bogged down in the nitty gritty, but it is definitely important to at least have a loftier level thought of some of these concepts if you lot want to sympathise how color calibration works.
If you just want to get on with calibrating your monitor, you can of course skip downward to that function of the mail.
Color Space
The offset thing we're going to cover is the idea of a color infinite.
A colour infinite is a way to lodge and define colors, across a diverseness of applications. For example, a commonly known color infinite in many industries is the Pantone Colour Matching System. This has a huge number of standardized colors, each of which has an individual number.
A system like this means that different manufacturers tin can create products entirely separately from each other, and know that if they choice the same Pantone color, the concluding products will be the aforementioned colour. The Pantone system, for instance, is commonly used by fashion designers, cosmetics companies, interior designers, graphic designers, and paint companies.
In the world of brandish engineering, modern displays use a colour space based on the RGB colour model. A color model is simply a means of describing how a color is made.
RGB stands for Ruby-red Green Blue, and this indicates that every colour displayed on a screen is made up of these iii colors in varying intensities. It is what is known as an additive color model, because these three colors are added together to make the final color.
If y'all looked very closely at your display, you would meet that information technology is fabricated up of pixels. Each pixel is composed of three little colored lights, a red light, a dark-green lite, and a bluish low-cal. These lights are referred to every bit channels.
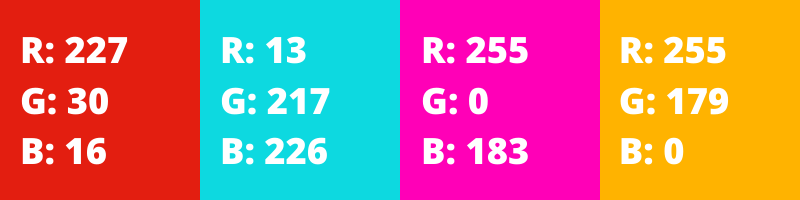
To define each color a screen can display, a number betwixt 0 and 255 is assigned to each of these three channels. 0 means none of that colour, 255 means all of that color. For example, ruby is denoted every bit RGB (255, 0 ,0). This ways to bear witness this color, the monitor must prove 100% of the ruby-red lite, and 0% of the green and blue low-cal.
White combines all three colors, RGB (255 ,255, 255), and at the other end of the spectrum you get black by the complete absence of all three, RGB (0, 0, 0).
Between black and white, and using the RGB arrangement, a monitor can brandish over 16 million colors! This is because each color it creates tin can be represented by upwardly to 256 intensities of red, greenish and blueish. If you lot multiply each of these together, 256*256*256, you finish upwards with over 16 meg possible color combinations. Here are some examples:
So RGB is a color model. Let's become back to color spaces. In the world of brandish engineering science there are a number of colour spaces based upon the RGB color model which are commonly in use. The ii nearly mutual of these are the sRGB color infinite and the Adobe RGB color space. The default color space that the majority of devices in the earth utilize is sRGB.
Both of these color spaces use the same underlying concept, in that each possible color they are able to brandish is made up of blood-red, green, and blueish and each of those is available on a scale from 0 to 255.
All the same, Adobe RGB spreads the colour infinite out more than than sRGB. Every bit a result, it can display a wider range of colors. This range is known as the color gamut, which we will comprehend in the next section.
What this means in practise is that the aforementioned RGB values produce a dissimilar colour in sRGB compared to Adobe RGB. And then for case, RGB (227, 30, 16) refers to a different color in sRGB compared to Adobe RGB. This is why information technology is so important to know the color space, equally information technology direct affects the last colors that are displayed on the monitor, every bit it is converting all these numbers into actual colors on the screen.
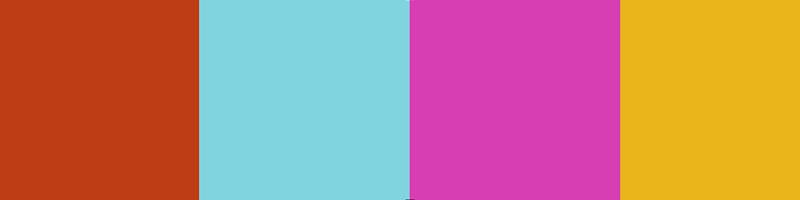
Taking the to a higher place image equally an instance, if this is saved as an Adobe RGB image, simply viewed incorrectly as an sRGB image, it might wait equally follows.
Let's look at some other example to testify the difference.
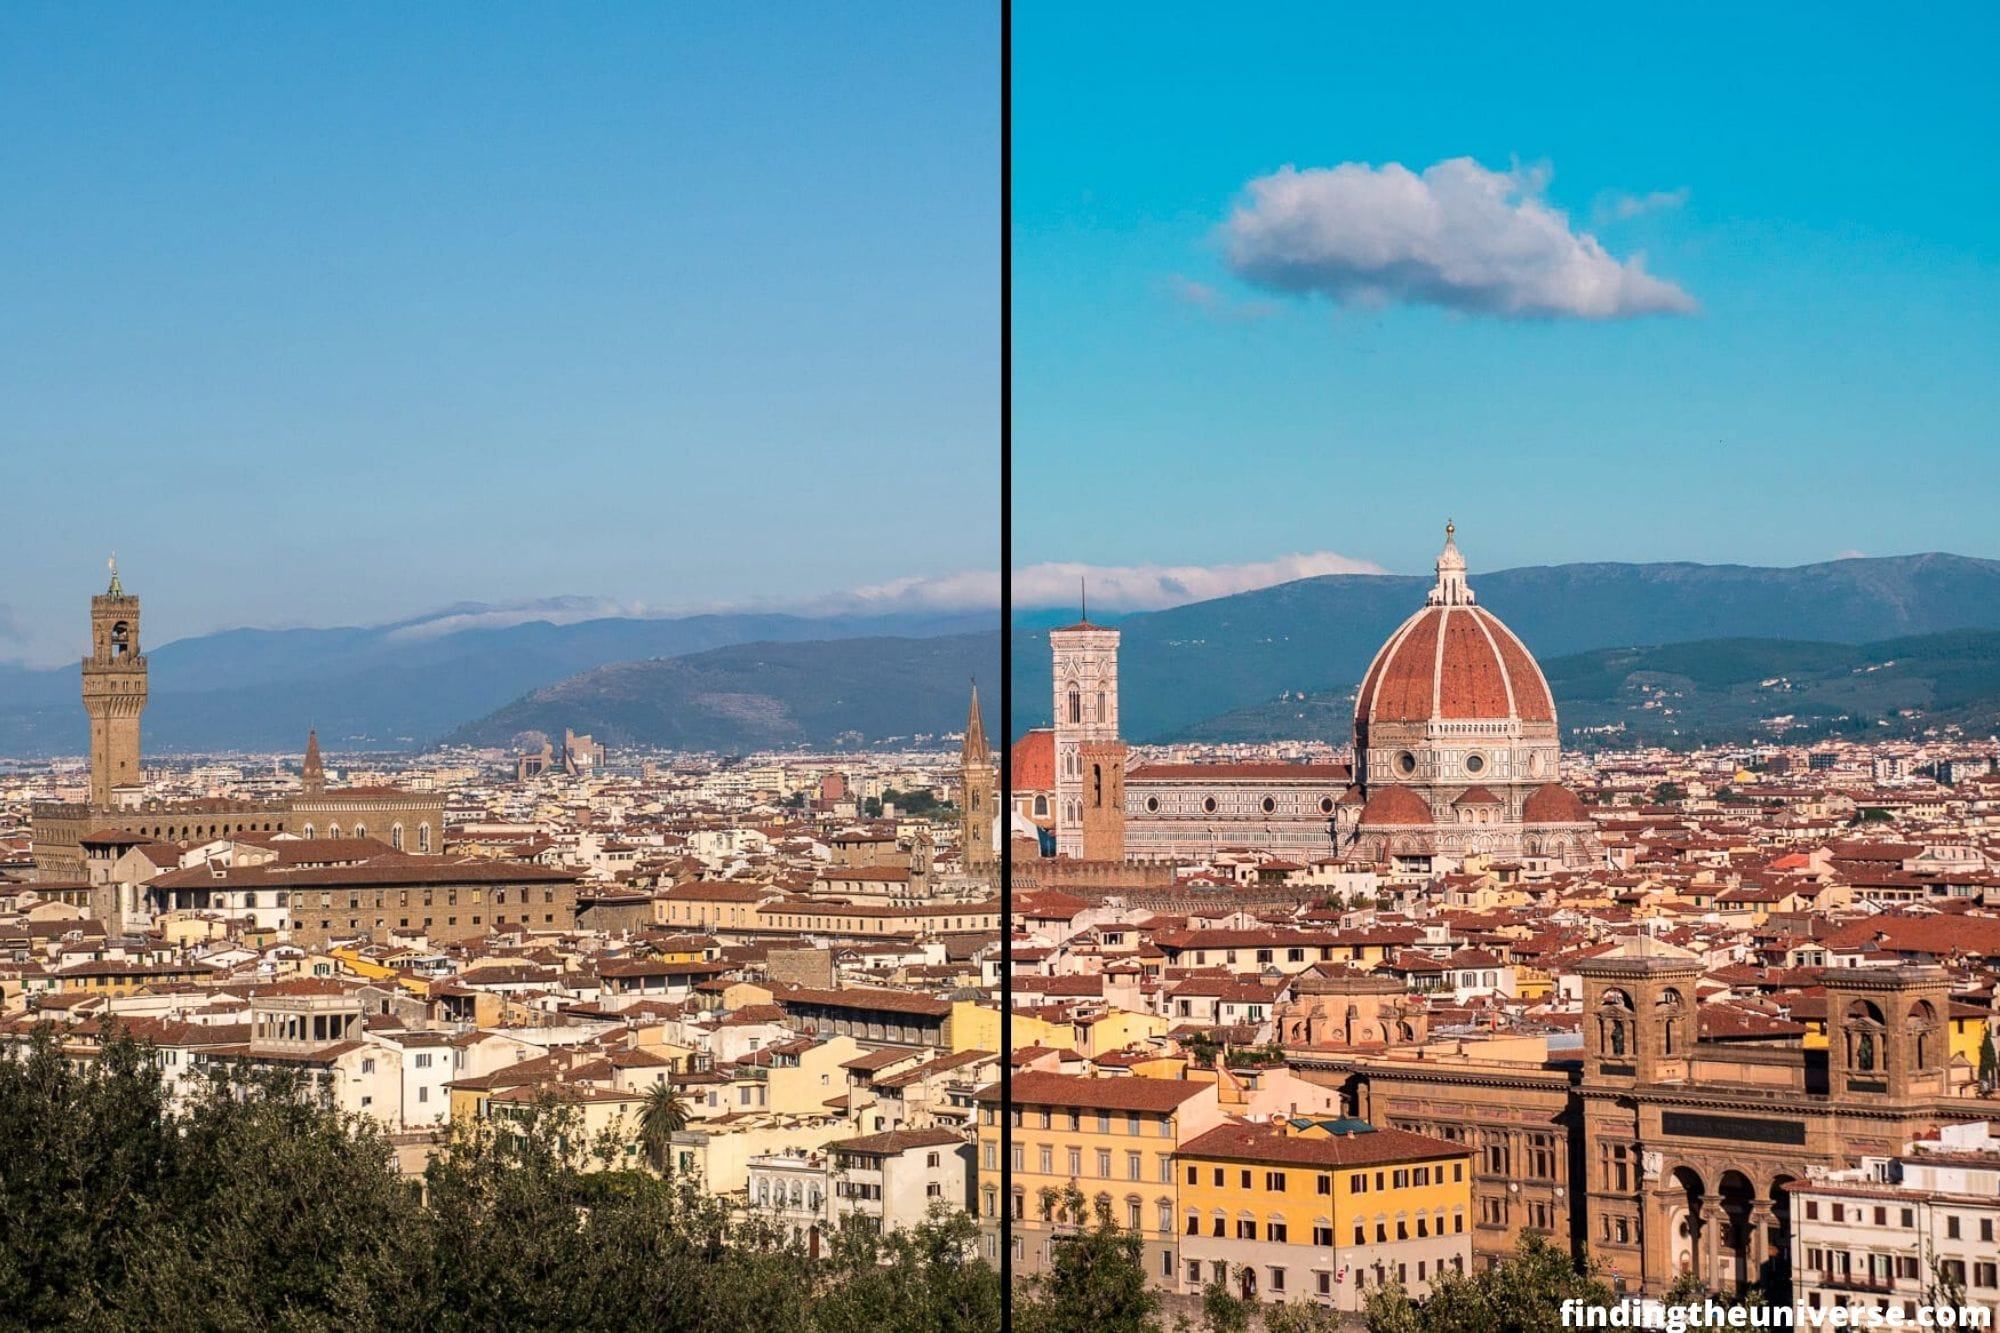
The higher up image is two halves of the aforementioned prototype, to demonstrate how colors tin change when in that location's a mismatch betwixt profiles. You can see in the left hand side of the prototype in a higher place that the heaven is much less saturated, and the reddish and yellows are more muted. This commonly happens when an AdobeRGB prototype (on the left) is loaded into an awarding that is expecting an sRGB image (on the right).
This is because the browser is reading the AdobeRGB colors in the prototype, each one represented by codes like RGB (123, 130, 101), but actually displaying them equally sRGB colors.
Information technology is important to know what color infinite y'all are working in, and what color space y'all are targeting. If you lot are using a wide gamut monitor, y'all will likely be working in Adobe RGB, or another broad gamut colour space.
For print, y'all volition probable salve your images in Adobe RGB, although your impress shop will likely tell you what profile they piece of work with. If you are sharing your photos to the web, you will likely want to convert them to sRGB for the greatest compatibility.
If y'all do not take a wide gamut monitor, y'all volition be working in sRGB, and saving your photos in sRGB.
This all should piece of work fine, every bit you can catechumen images between colour profiles. The bug start to arise if you salve an image in one color profile, only they are opened as another color contour. This is when you start to encounter mismatches like the prototype higher up.
Gamut
In color, a gamut indicates the width of colors that a color space contains. We will be using sRGB and Adobe RGB for comparing here. It'due south worth noting that as they are both based on the RGB color model, they both have the capability to display around 16 million colors, with 256 values available for each of the three colors.
Still, these colors are spread out differently with the 2 color spaces. Permit's look at a couple of diagrams to demonstrate this.
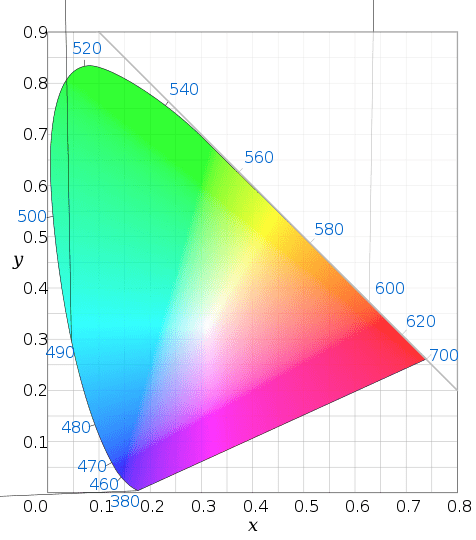
The in a higher place diagram approximately shows all the colors that the man middle can see. Now, allow us compare this to the sRGB color space and the Adobe RGB color space.
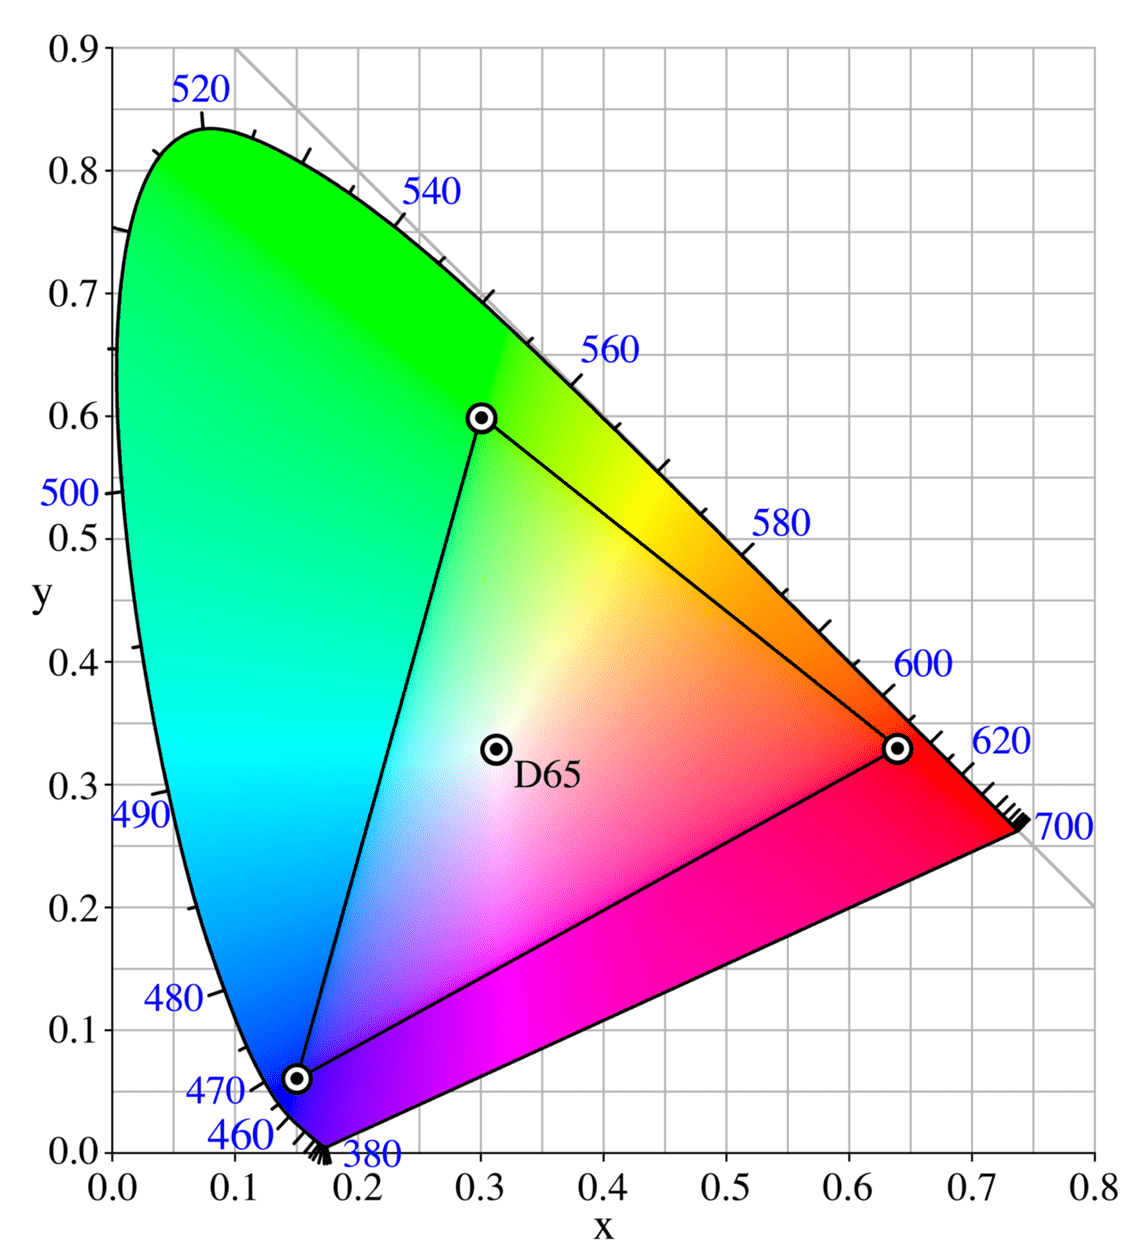
The diagram above shows the sRGB color space. The triangle shows all the colors that sRGB is able to display. Now let us compare sRGB and Adobe RGB.
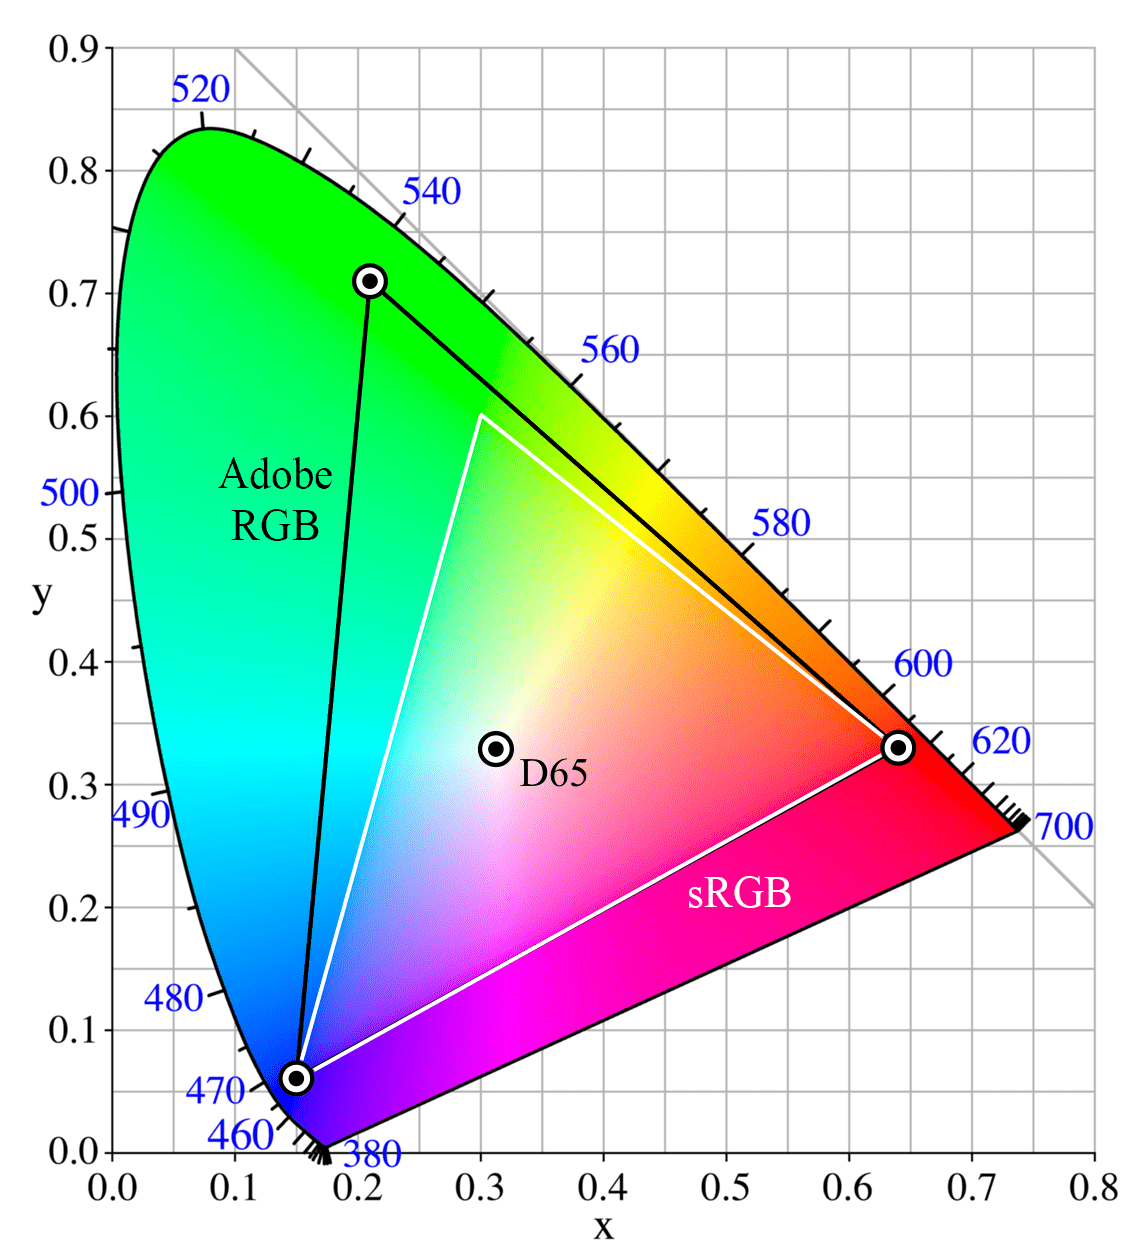
Every bit you can run across from the above epitome, the Adobe RGB color space (black triangle) covers a wider amount of colors, particularly in the greens, than the sRGB colour space (white triangle).
Once again, I want to signal out that both colour spaces contain the same number of colors. It's simply that the colors in Adobe RGB are spread out more, so the difference betwixt each colour is wider.
If a monitor or display tin support a gamut wider than sRGB, then it is known as a wide gamut monitor. Wide gamut monitors tend to be more than expensive than standard gamut monitors, and are primarily used past photographers, videographers, and graphic designers.
A standard monitor volition unremarkably support viewing sRGB, or at least, most of the sRGB gamut. When you lot read the monitor specifications, or reviews of the monitor, yous should be able to discover out how much of the sRGB gamut it covers.
A wide gamut monitor is designed specifically for content creation tasks where color accurateness is of import, such equally photograph and video editing. A wide gamut monitor will normally be able to display 100% of the Adobe RGB gamut, which contains 100% of sRGB.
At an absolute minimum, if you are in the market place for a new monitor or laptop, ensure it tin display 100% of the sRGB gamut. For professional use, I would recommend a broad gamut monitor, as long every bit yous are willing to properly set it up.
Many loftier end laptops and even smartphones these days come with wide gamut screens, just always check earlier purchase if this is of import to you.
Color Profile
A color profile takes two forms. First, a color contour is associated with a display, and sets out what colors the display is capable of displaying.
2nd, a color profile is associated with an prototype, and sets out the gamut range of that paradigm, such as sRGB or Adobe RGB.
When you save an image, the color profile is saved as a part of information technology. This is so that when you open up the image with an paradigm viewer or a web browser, information technology knows what the colors should exist.
When I mentioned earlier the concept of saving an image as an sRGB or an Adobe RGB epitome, this is done with a color contour.
When information technology comes to saving an image, y'all tin call back of a color profile a bit like a legend to a map—the map only makes sense if you know what the symbols mean, and the legend does that.
A color profile only works if the awarding you are opening the prototype in supports colour direction. This didn't used to be the example, especially with web browsers. Thankfully these days the bulk of programs and software products do support color management, including about web browsers such as Chrome and Safari.
However, some operating systems such as Windows x, do non back up color direction in their native apps. Then parts of the interface may appear oversaturated on a broad gamut color managed monitor, even afterward calibration.
This is because if an application doesn't support color management, then it will usually assume the image uses the standard sRGB profile. This can result in strange results on a broad gamut monitor.
The solution is to only utilize colour managed applications when using a wide gamut monitor, so the colors expect correct.
Equally mentioned at the outset of this section, displays also accept a color profile, which indicates the range of colors that the monitor can brandish. Some monitors can only brandish the sRGB gamut, whilst others can display wider gamuts such equally Adobe RGB.
The color profile for the monitor is usually stored as a file, and referenced by your computers operating organization or graphics card. It allows the reckoner to know what the monitor is capable of, and to output the correct information to the monitor then it displays the correct colors. Monitor color profiles are ordinarily saved as minor files with the .ICC extension.
A monitor or brandish will come with a colour profile that your computer will use by default in most cases. Alternatively, the operating system you use will have a standard color profile which information technology will use as a autumn dorsum.
However, a better solution to either of the in a higher place options is to create your own ICC profile to match your monitor. You can do this either using software calibration tools, or by using a device known as a hardware colorimeter. More than on this in the section beneath on how to calibrate your monitor.
Brightness
OK, we're onto the easier parts now. The bulk of monitors and screens on the market take a brightness command, which allows you to alter the intensity of the light coming from the display.
Effulgence, which tin can also be referred to every bit luminance, is measured in candela per square meter, or cd/m2.
Higher effulgence results in more intense low-cal, lower brightness results in less intense lite. Commonly, you will arrange the brightness depending on the overall lighting situation in your detail setting.
If you are trying to work somewhere where in that location is a lot of light, you will probable need to increase the screen brightness so you can run into the screen properly. This is considering in a well lit surround your eyes adjust to the ambient effulgence, and make the screen seem dark. So you have to increase the effulgence.
If you lot are working somewhere where information technology is darker, y'all can reduce the brightness.
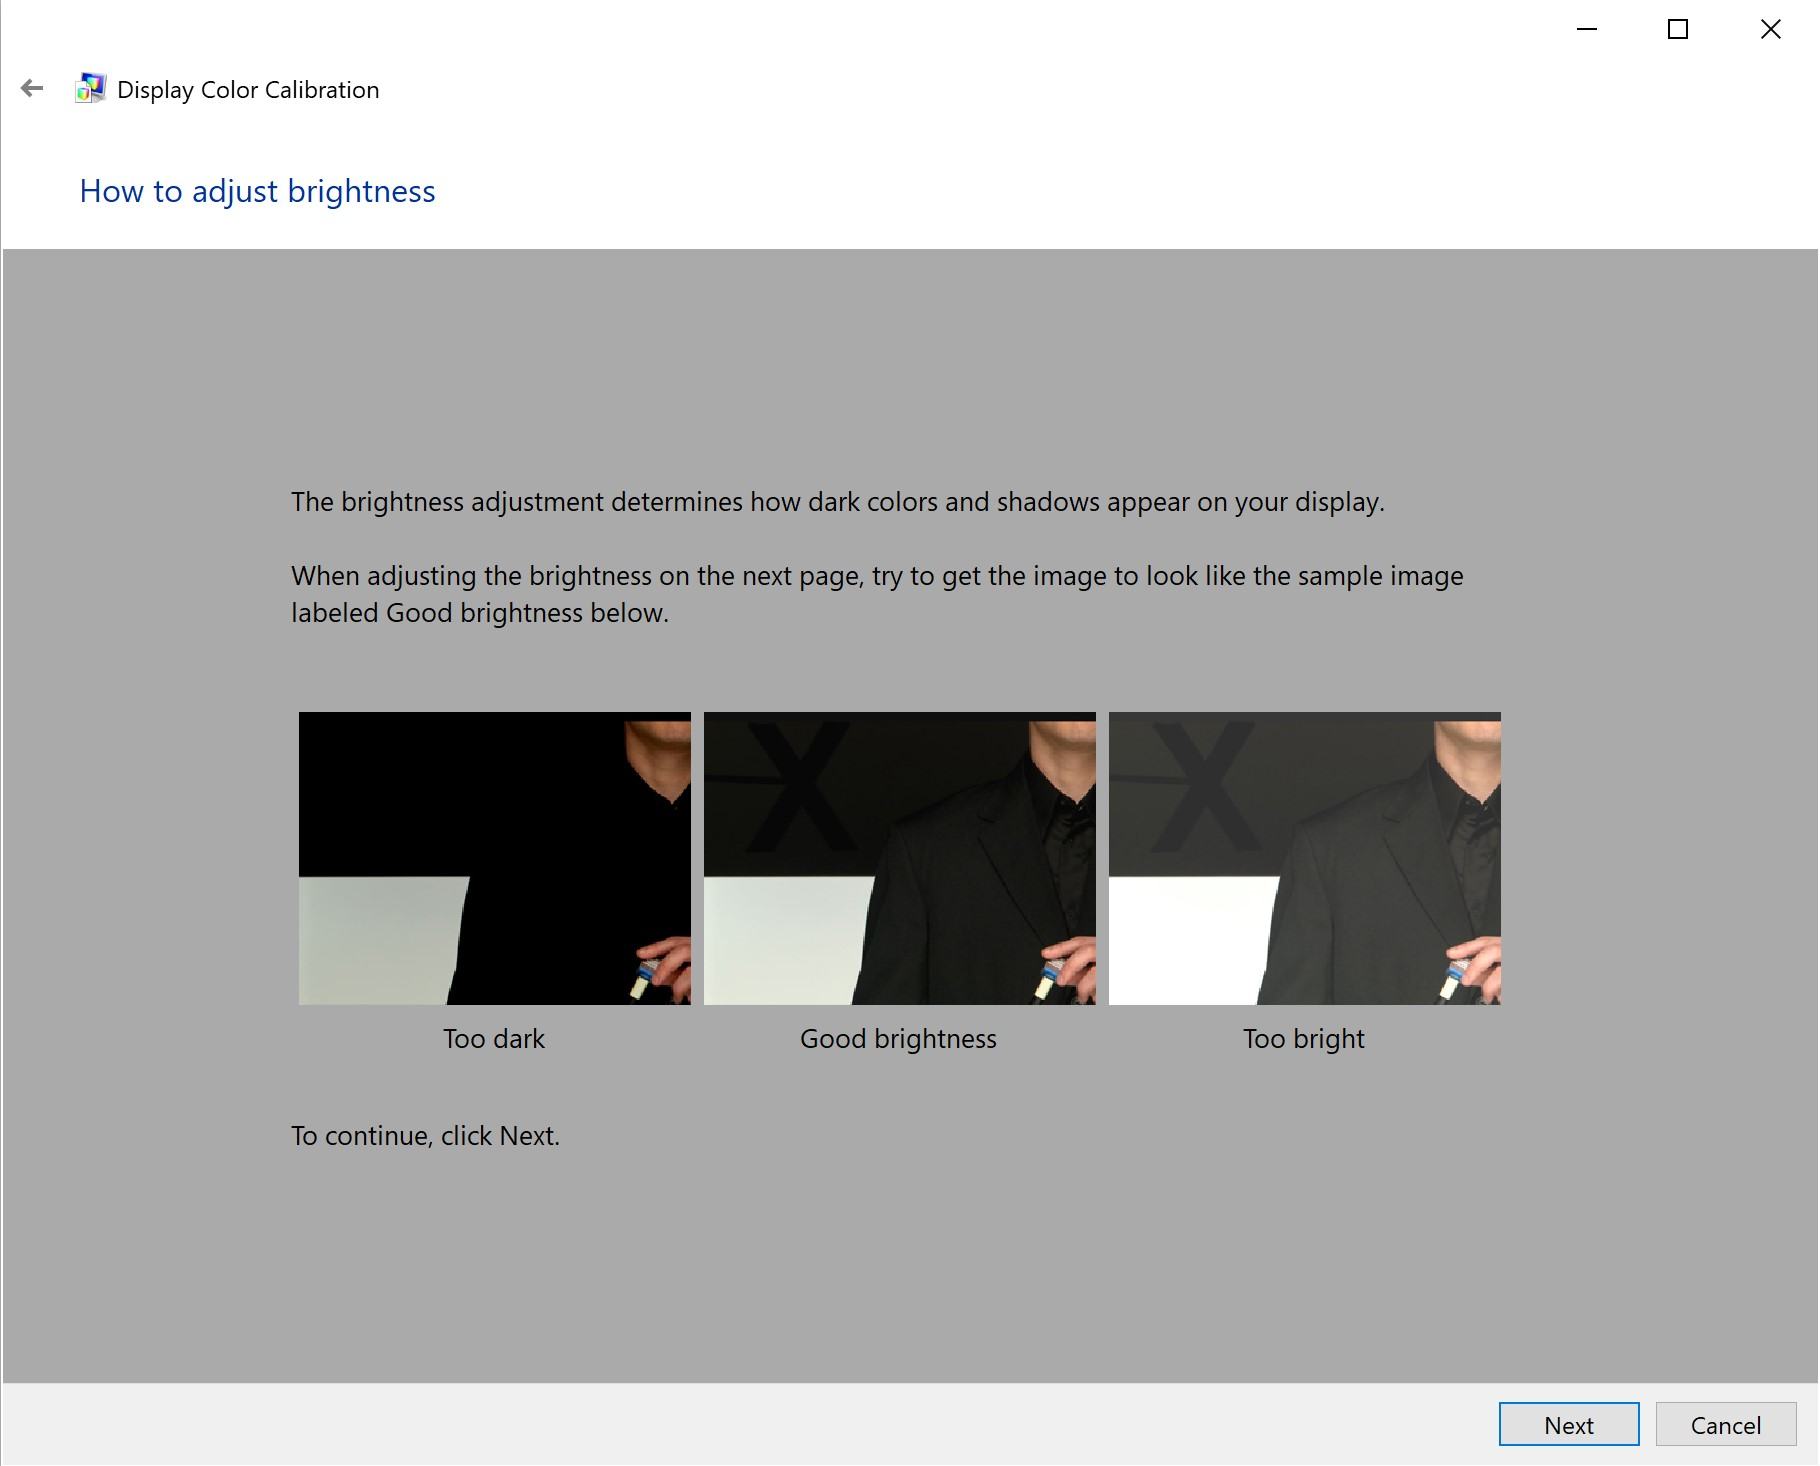
Information technology is worth bearing in listen that the effulgence of a screen does touch on how colors announced. In addition, if you edit your photos on a bright screen, yous might incorrectly arrange the image effulgence. The result is that your printed images come out too night.
When information technology comes to photo editing, 120cd/m2 is the brightness value more often than not agreed upon in the photography industry as a good effulgence value when working on images you intend to impress. This is based upon the ISO standard for viewing paradigm viewing weather condition, ISO 3664:2009.
In reality, this brightness level is actually quite dim, and would require you lot to exist editing your photos in a fairly depression lit surround. This is the ideal situation, simply is unfortunately not necessarily realistic for most users.
Every bit a event, many users accommodate their effulgence to college levels to suit the ambient low-cal of their working environment.. Just be enlightened that prints can turn out darker if your monitor is set to a high effulgence level. For this reason, I recommend ever doing proofs of your prints earlier the final version if yous are selling prints of your work. For the web, every bit most users likely take quite a high brightness setting already, this will be less of an issue.
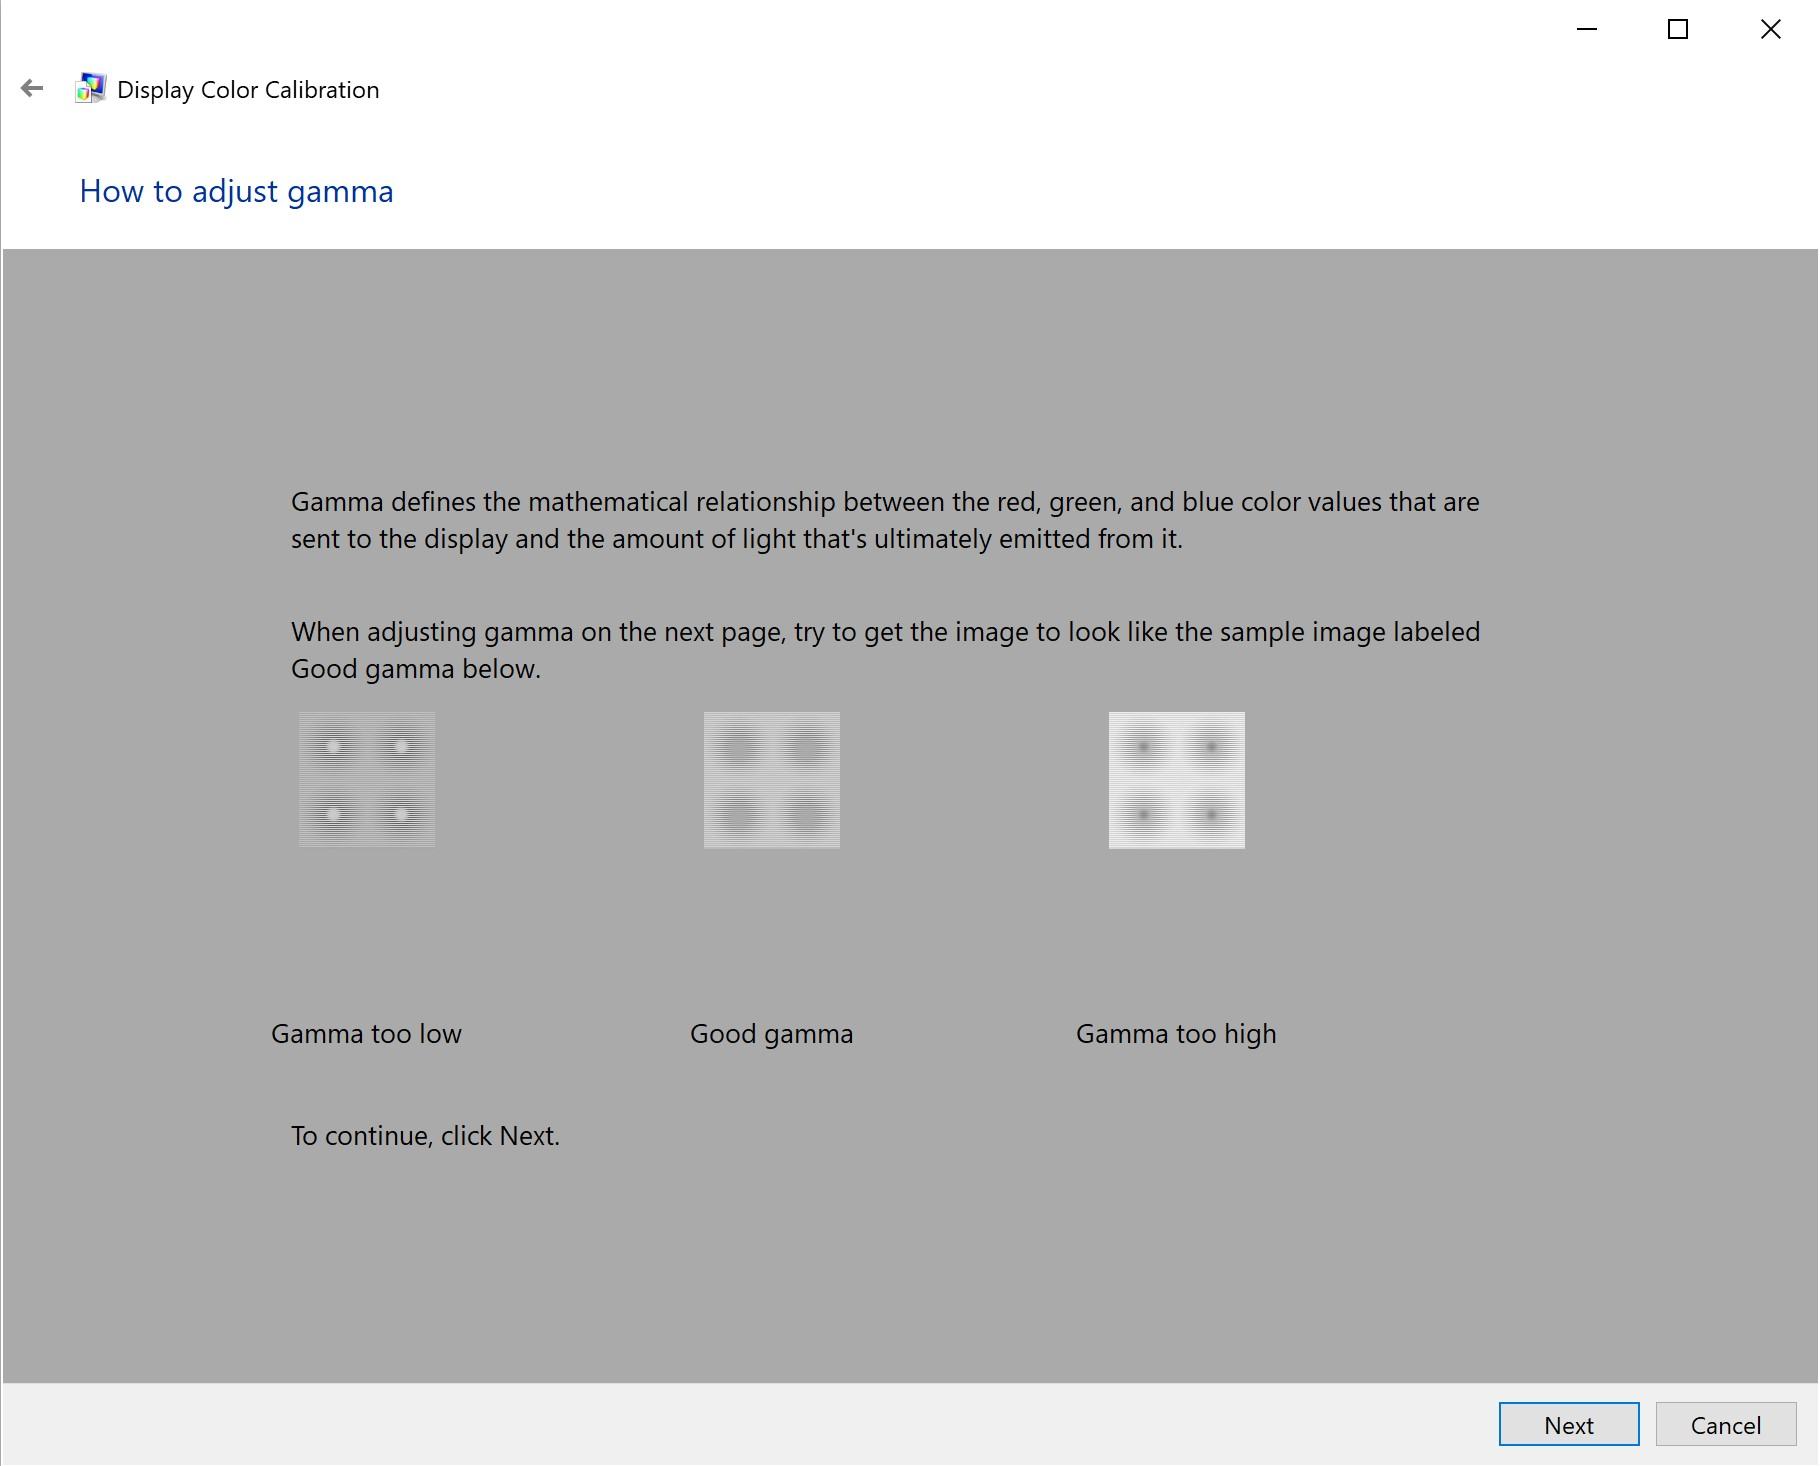
Gamma
When yous adjust the effulgence of a screen, it equally affects all the colors on the screen. This can result in black areas becoming grey and washed out, which is undesirable. Decreasing the brightness has the opposite effect – blacks become more black, only white starts to become grey.
Gamma is a different fashion to adjust the perceived brightness. When yous increase the gamma, it lightens the lighter shades more than the darker shades. Then blacks stay black, just white becomes lighter. And so instead of a uniform change to the overall image, the modify is applied every bit a curve.
Brightness and gamma controls are independent of each other. Whilst most monitors take a brightness correction, few have gamma controls. However, y'all tin unremarkably control gamma via your reckoner, and this is usually washed with a software or hardware calibration tool. More on this in the section on calibrating your monitor.
Saturation
Saturation is a control that many devices and displays offer us, and information technology affects how colors look. Increasing the saturation results in colors appearing brighter and more vibrant, whereas lowering saturation results in colors appearing duller.
When calibrating a monitor, it's important that the saturation levels are set up correctly so images appear as they should. If you lot have your monitor saturation set besides high, then yous volition create images that might announced dull when you print them or share them on the spider web.
White Indicate
Before, we mentioned how in RGB, white corresponds to RGB (255, 255, 255). Basically, the three channels are combined at their maximum values to create white.
Unfortunately, there are different versions of "white". This is because how we perceive white varies depending on the lighting conditions. Our brains adapt and adjust what we see every bit white, depending on these weather.
For instance, imagine y'all take a white piece of paper. If yous concord this outside in the midday lite, your encephalon will perceive it as white. If you were then to come inside and view it nether indoor lighting weather condition, which vary dramatically, your brain would adjust then information technology nonetheless appears "white". Even so, in reality, it is probable 1 of a variety of whites, ranging from a warmer, yellow white, through to a cooler, blue white.
If y'all've always bought a light bulb, you will have noticed that they tin come in a huge diversity of "white" colors. These are basically different white points.
When calibrating a monitor, you can cull a white indicate. This will allow you lot to cull what sort of white y'all want, from a warmer yellow white tone through to a libation blue white tone. The white tone will vary depending on your surround. If you lot are working in an environment with libation lighting, you lot will want a libation white point, every bit otherwise your screen might appear besides yellow to your eyes.
Conversely, if you take more warm lights in your working environs, y'all will want a warmer white betoken, as otherwise the screen may appear as well blue to your eyes.
The white signal is divers as a number, measured in K, or Kelvin. This actually refers to a temperature – if you're wondering why, meet this commodity. A warm white indicate would exist 5,000 Grand or lower, whilst a cool white point would exist 6,500K or college. Daylight is more often than not measure at v,500 K.
For photograph editing, a white point of between 5,000 K and half dozen,500 Yard will usually work best, depending on your monitor and ambient lighting conditions. Nigh calibration tools will recommend vi,500 K, which is the standard if y'all are working in perfect conditions. Nevertheless, I find that this makes my monitor look besides blue, so I personally use 5,000 Grand.
How to Calibrate Your Monitor for Accurate Colors
Ok, nosotros've done all the terminology. Hopefully it all made sense or you at least have a general idea of some of the reasons why monitor calibration is important. Allow's now look at how to actually calibrate your screen.
If yous are using a laptop or desktop with an external screen, yous have two chief options for calibrating it, which are to use the software that it comes with or to use a hardware device known as a colorimeter.
If you lot have a smartphone or tablet, most of these exercise non allow for complex color calibration, although they might permit you to adjust saturation and other features. My advice would be to properly calibrate your monitor offset, and and then adjust whatever settings on your smartphone yous tin can to make images look similar.
Software Monitor Calibration
If you have a Mac or Windows PC, then you lot will be able to use the congenital in software to calibrate your monitor. The process is similar for both platforms. Basically y'all launch the color management tool on each platform, and will be taken through a number screens where you can calibrate your monitor.
On Mac, go to System Preferences -> Displays, and and so click the Color tab. This will show a list of profiles, and to the right will be an option to Calibrate. To start calibrating, choose this Calibrate option, which will launch the scale tool.
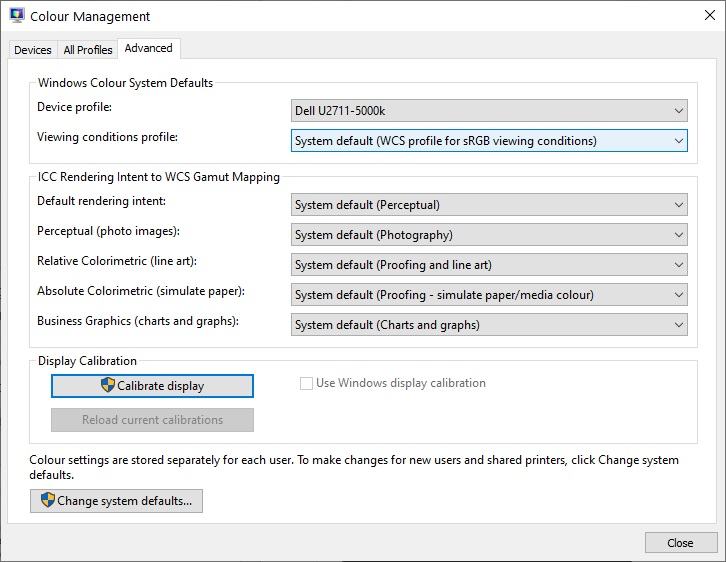
On Windows, just type "Color Direction" into the start menu, and choose the "Advanced" tab. Then, in the section titled "Display Calibration", press "Calibrate Display".
I will walk you through what this looks like on Windows with some screenshots to requite you an idea of what this looks similar. The process is very similar on an Apple device.
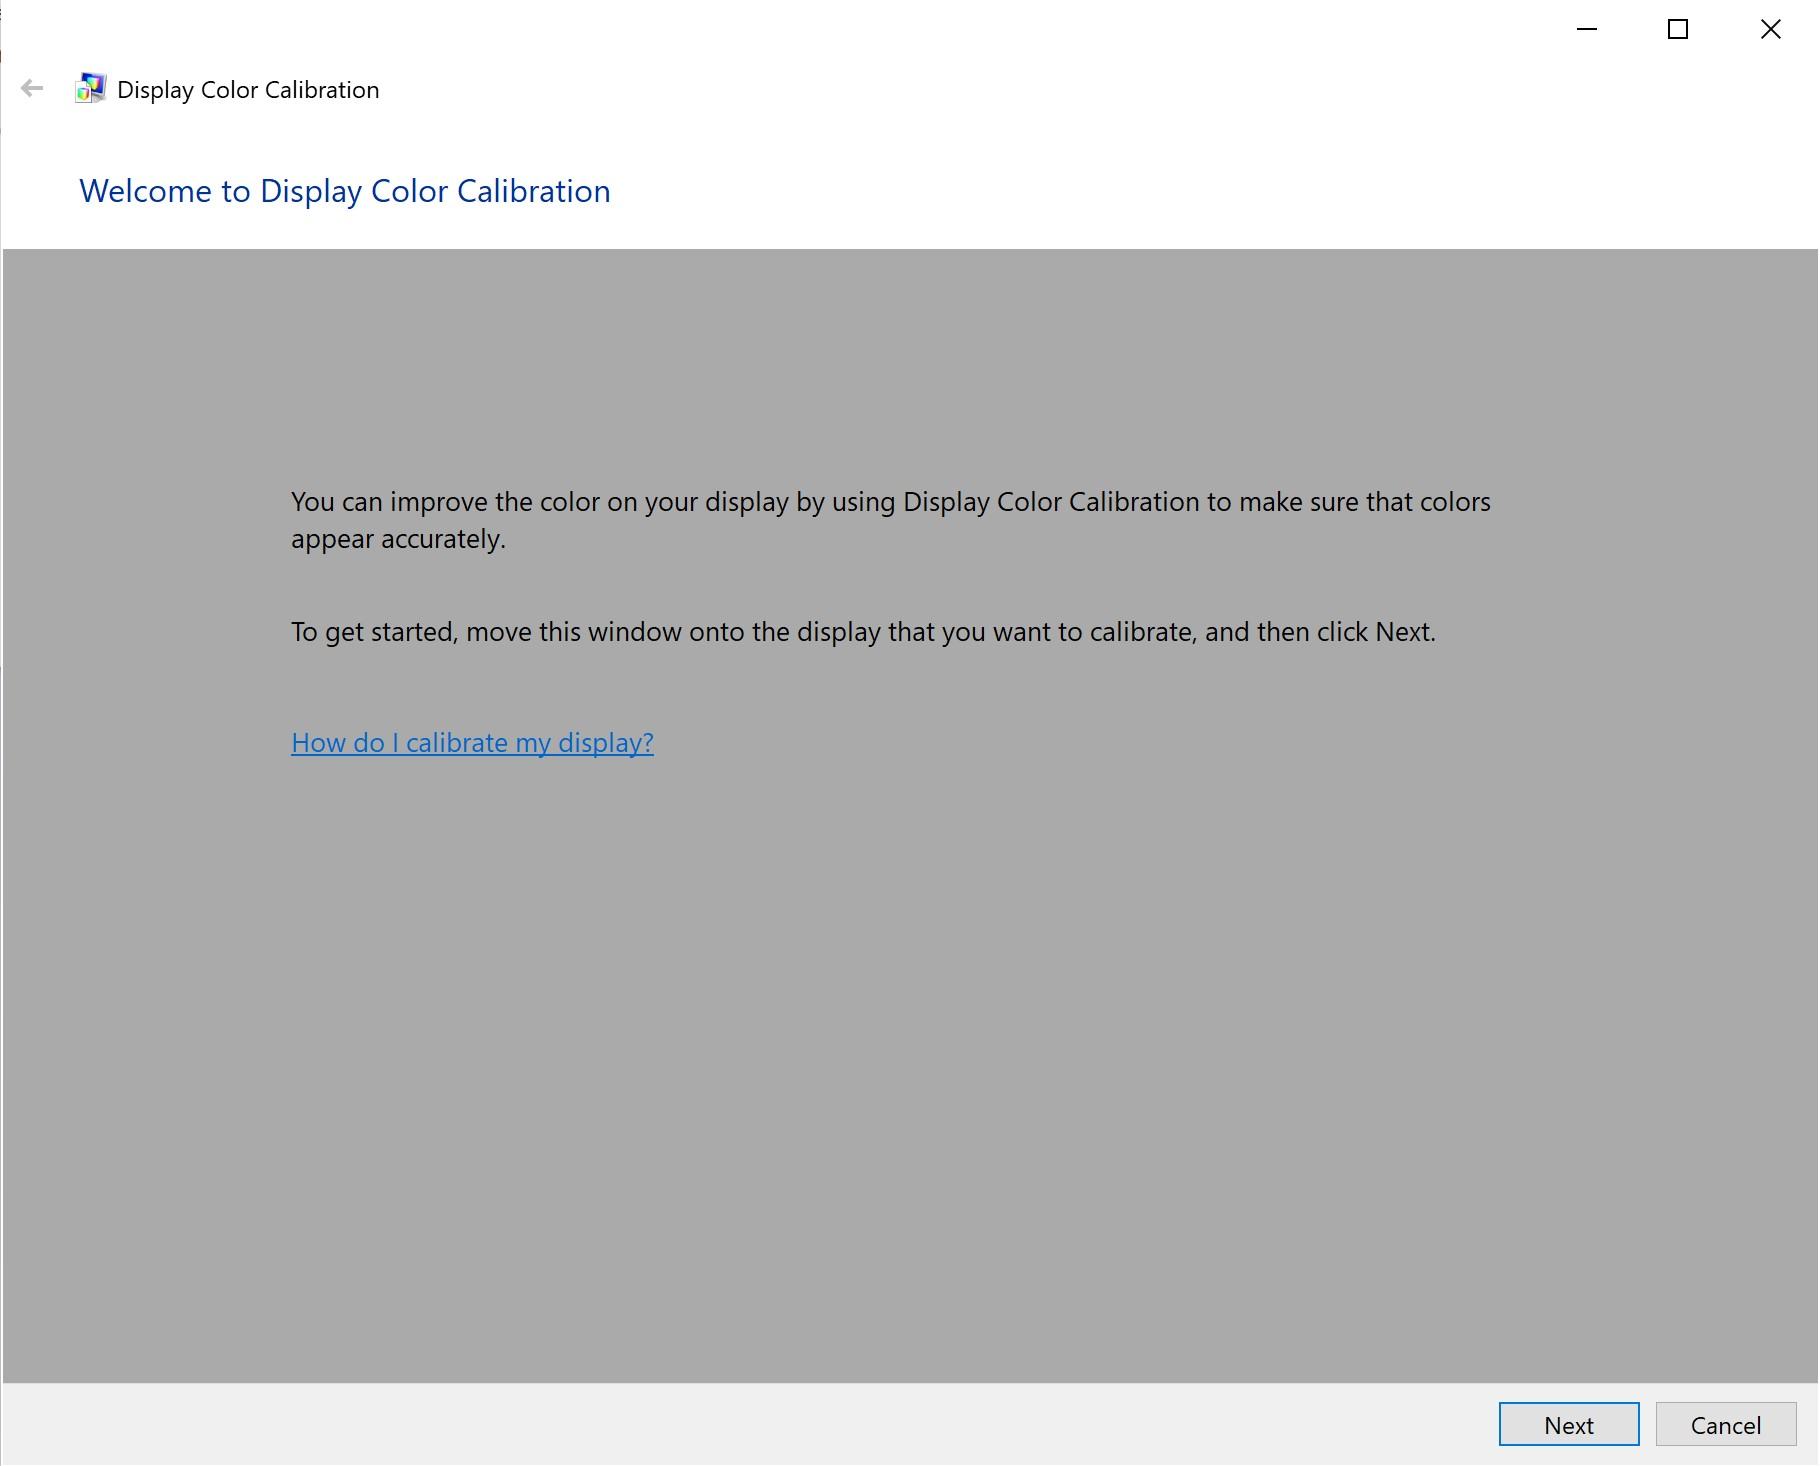
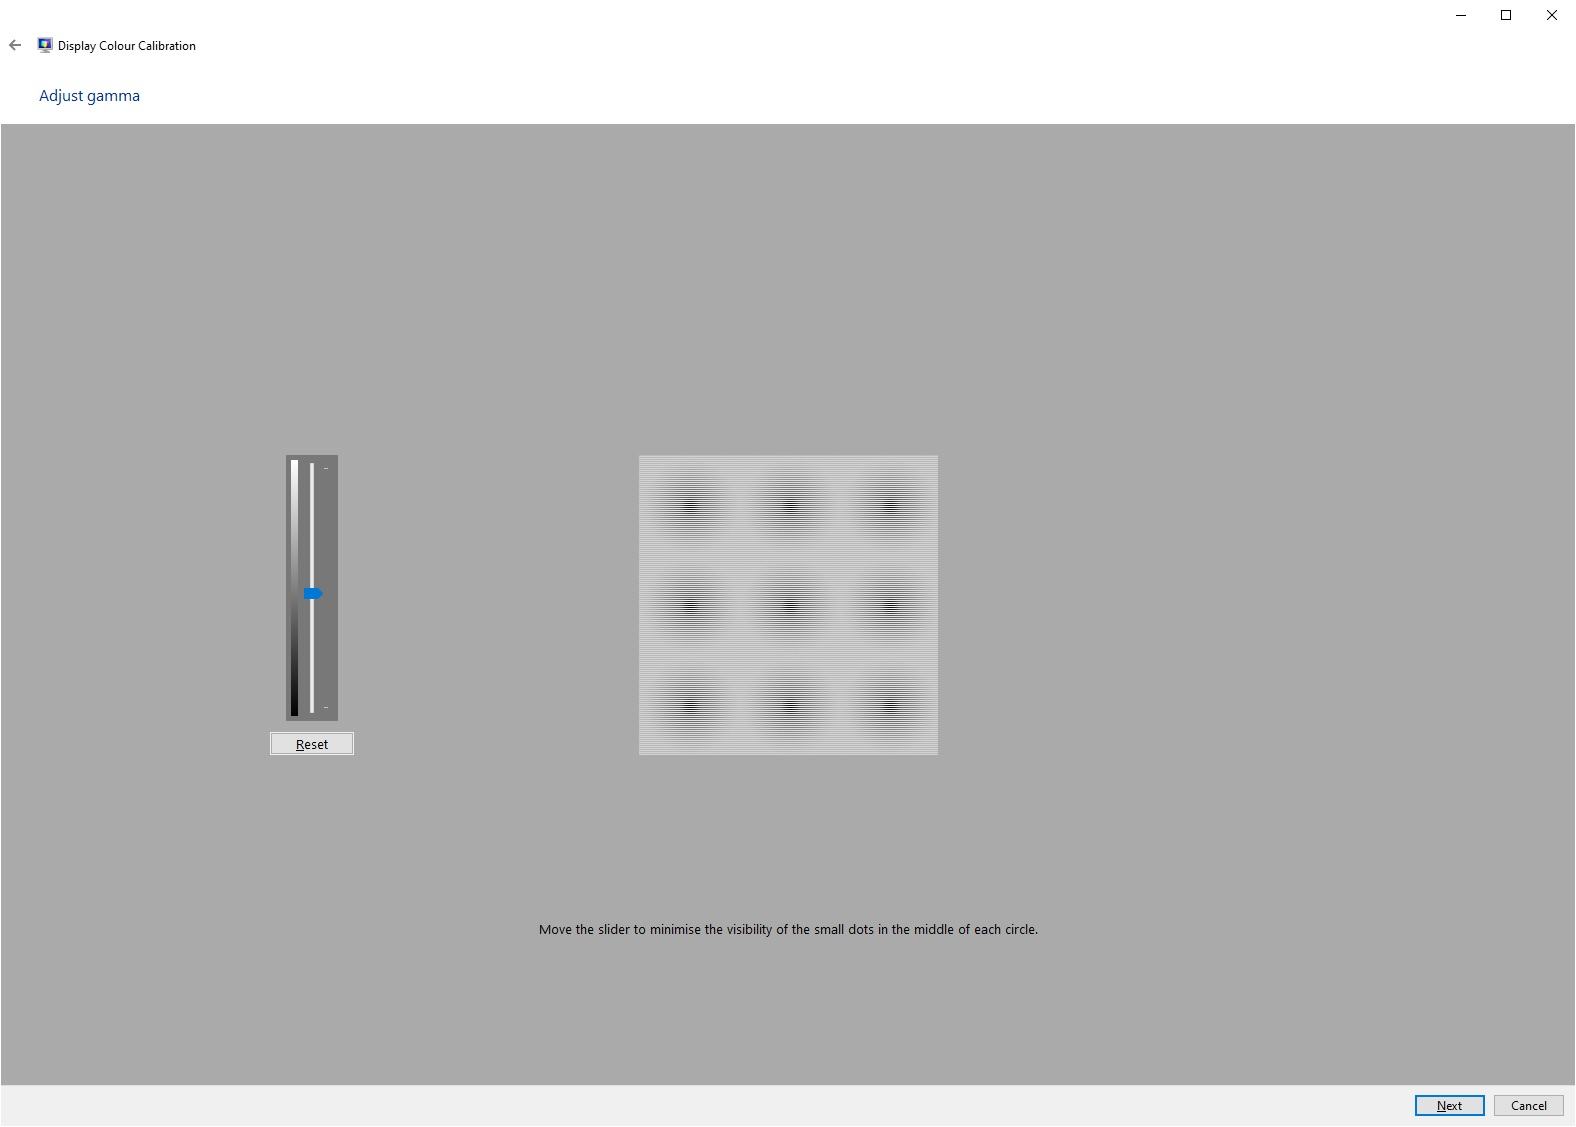
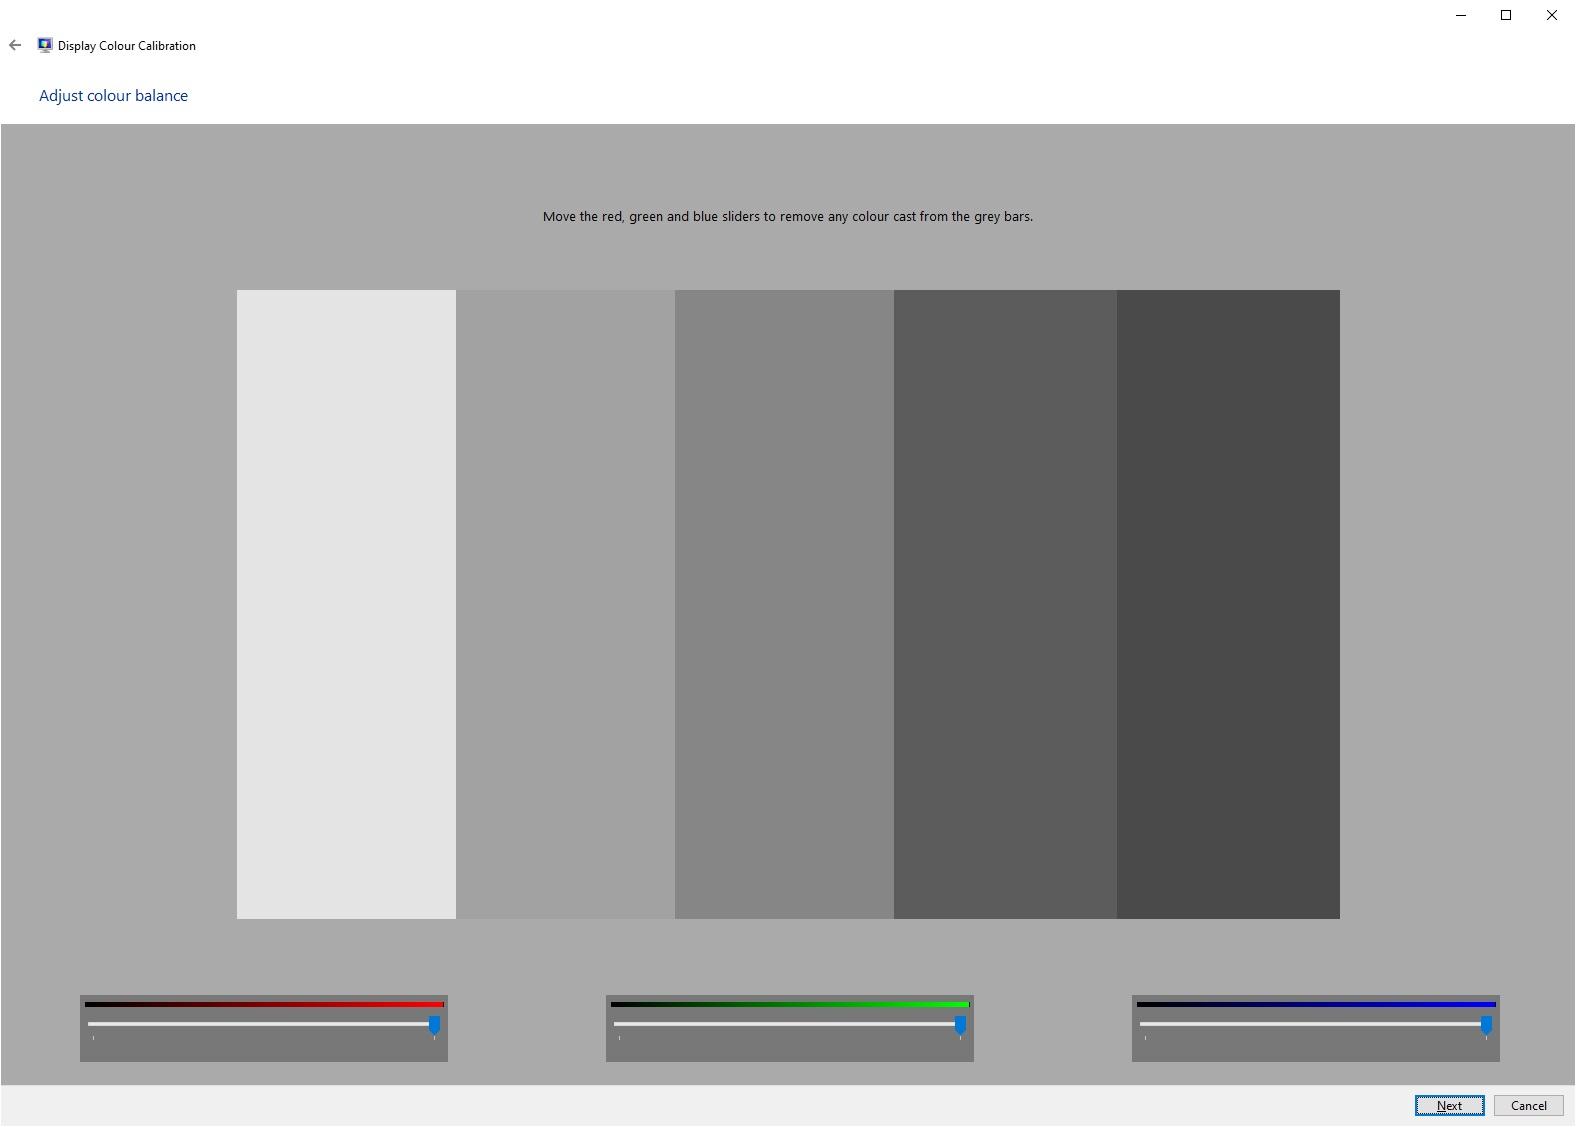
As you can meet, when y'all go through the process, the programme tells you what to look for, and yous then make adjustments using either sliders in the app, or the on-screen controls your monitor offers you lot.
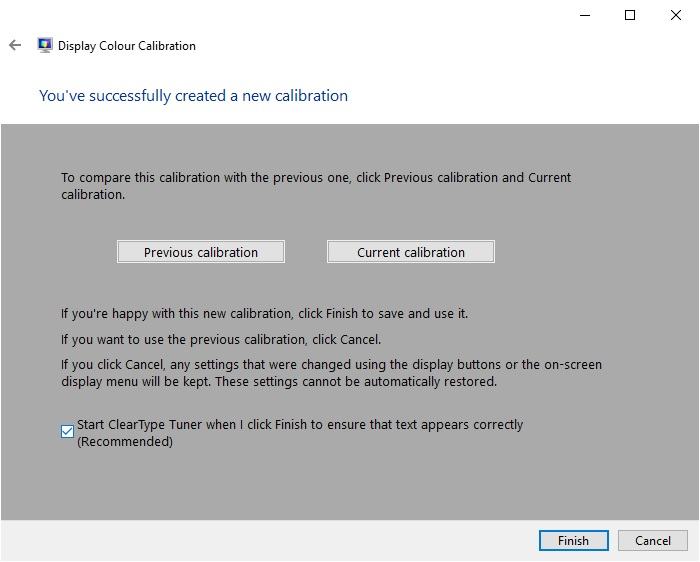
When you get to the stop of the process, you will exist given the opportunity to compare the original calibration and the new calibration, and so to save and apply the calibration.
Using your computer's congenital in calibration is obviously an piece of cake way to calibrate your monitor and it's also free.
However, there are some serious downsides to calibrating your monitor this way. The major issue is that you are relying on your eyes to calibrate the colors on your monitor.
Equally we've already covered, our eyes are very clever, and are able to adjust to the ambient lighting around us. Notwithstanding, this also ways that they tin't necessarily be relied on for creating accurate color profiles. If you've been sitting in a area of cooler light for a time, your monitor scale will expect different compared to if you are sitting in warmer lite.
Then whilst software calibration is improve than no calibration at all, if you plan on doing any serious photo editing with your brandish, you will desire to consider a hardware calibration tool instead.
Hardware Monitor Calibration
If yous are serious about getting the right colors on your brandish, then a hardware calibration device, known every bit a colorimeter, is the all-time pick.
These are physical devices which really measure the light that your display emits. Different the human being heart, they don't alter what they see based on the ambient light. And so you know that when they mensurate a white point or any other colour, the outcome is accurate.
For this commodity, I'll be using a Datacolor SpyderX Pro to walk you through hardware calibration of your monitor.
Datacolor have been working in the color infinite since the 1970s, and take been producing the Spyder range of consumer focused hardware monitor calibrators since around the early 2000s. Then every bit you might imagine, they know a thing or two about monitor calibration and colour direction.
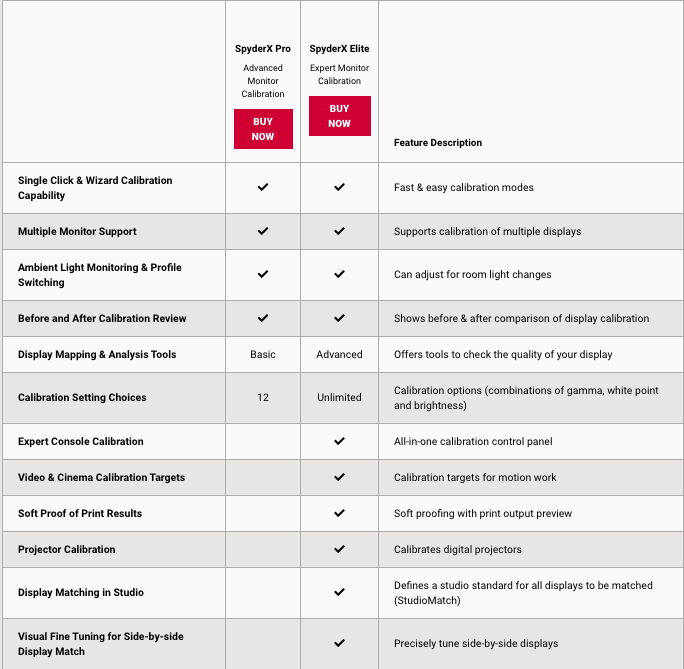
The latest version of their monitor scale tool is the SpyderX, which comes equally a Pro and an Elite production. I have the Pro, which should be fine for about users. They practice pretty much the aforementioned thing, the Elite just has a few extra features in the software, such as allowing you to compare monitors next. Y'all can see a feature comparison in the table below:
The new SpyderX is the first colorimeter from Datacolor that works using a lens, rather than a light sensor. This ways it is can do the calibration much faster compared to previous models. The previous version, the Spyder 5, took around v minutes to measure out and calibrate a display. The new model takes closer to 90 seconds.
This might not seem huge, only if you have a number of displays to calibrate, information technology is definitely a time saver. In addition, monitor calibration is a chore that should be repeated at least one time a month, as monitors tend to shift their colors over time. So if it takes less time, yous are more than probable to practice it.
Ok, on to using the SpyderX. It comes in a box which consists of the device and a piece of paper with the license code, and instructions for where to download the software. In the old days, the software would have likely come on a CD-Rom, just not anybody has these drives any more.
It might take been nice to have a USB drive with the software on it; however, doing an online download means you definitely get the latest version of the software. The download is just around 180MB, so it won't take much fourth dimension, even on slower connections.
The software works with both Windows and MacOS, and just requires a standard sized USB port on your computer.

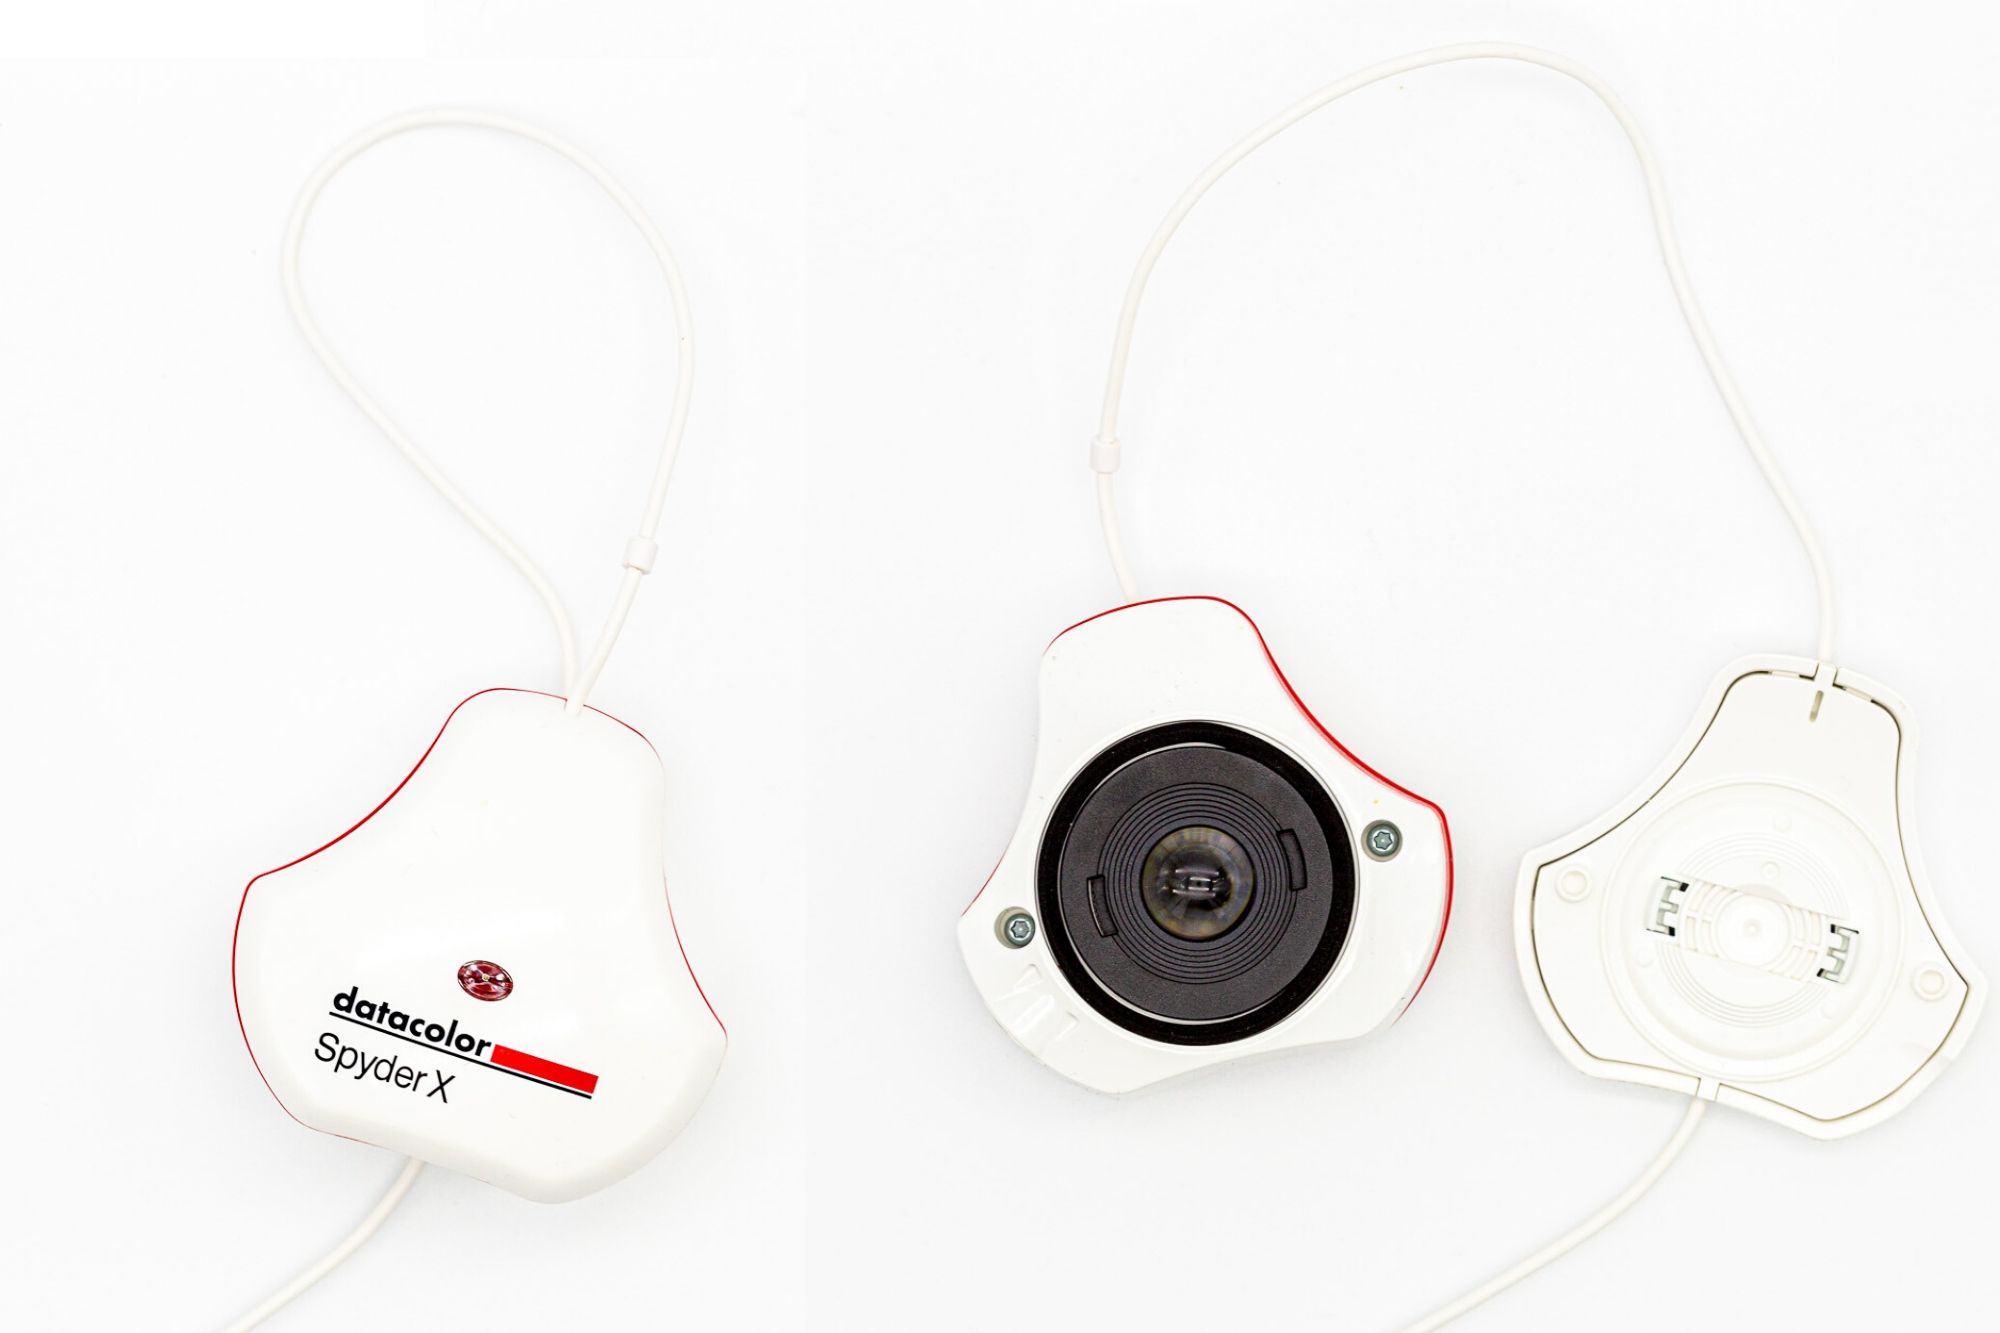
The device itself is a great little tool which comes in two parts. These clip together, and the lens is inside the device and protected when clipped together.
For use, you unclip the two parts, and claw the part with the lens over your brandish, and the "embrace" counterbalances it.
The ii parts are connected by a USB cablevision which can be adjusted, and which plugs into a gratuitous USB port on your computer.
Using the software is very like shooting fish in a barrel, fifty-fifty if yous are not a color management skillful. Which, honestly, most of u.s. are non. When you first run information technology, information technology will walk you through a checklist to ensure you have the right conditions for monitor calibration.
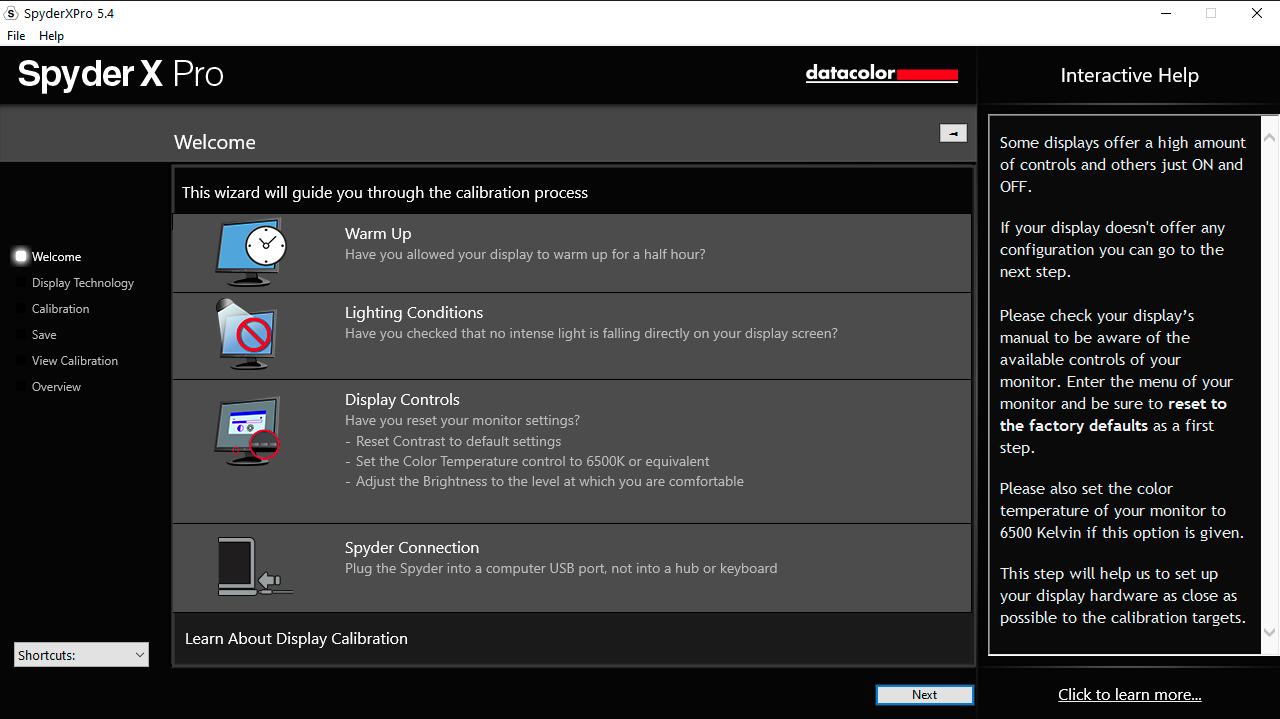
You lot accept to confirm that you have warmed the monitor up for at to the lowest degree 30 minutes, that there is no light falling onto the screen, and that you have reset your display to the default settings.
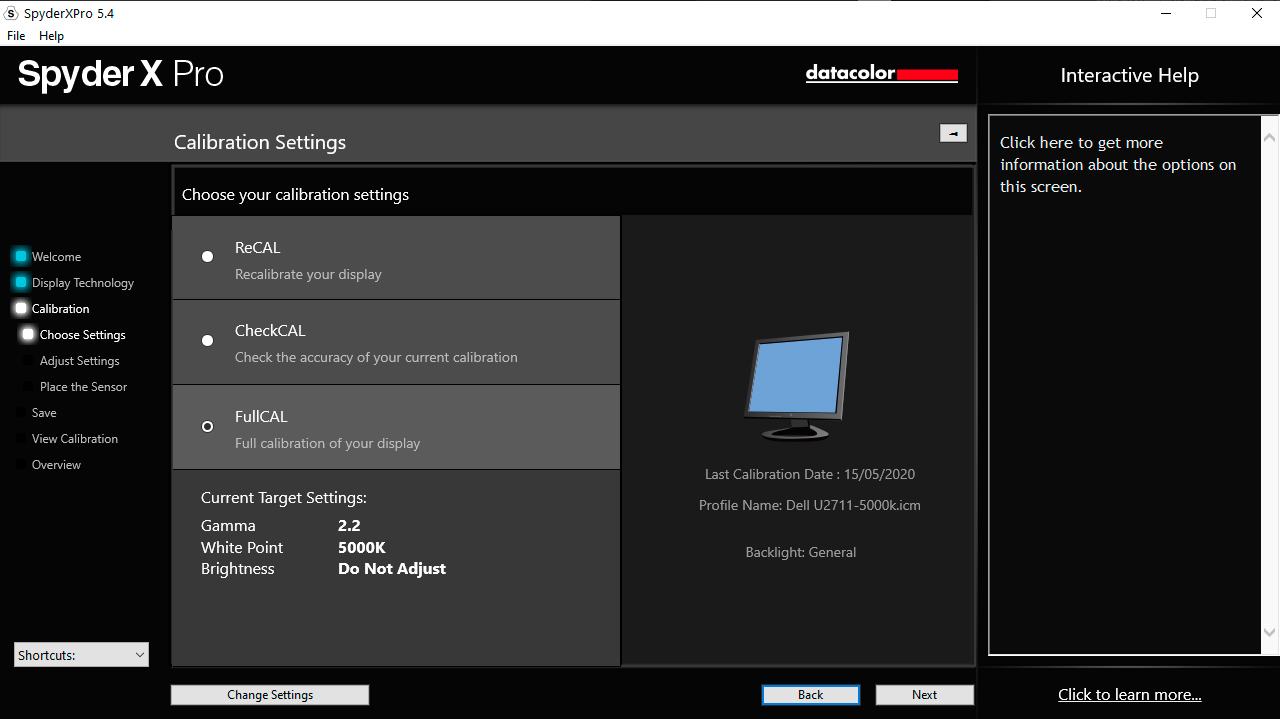
Then, you lot will get through a number of settings specific to your setup. It will ask yous questions virtually the type of brandish you have, and then give yous the options to recalibrate a display, bank check your display accuracy, or do a full calibration.
If this is your first time, you will desire to exercise a full calibration. Information technology will evidence you lot the target settings, based on your screen, that it is aiming for in terms of brightness, gamma, and white point. Y'all tin manually conform these options if yous want, simply for the starting time run I would advise leaving the default settings.
There is another characteristic that is quite peachy, which is the room lite setting. In an platonic world, we would be editing all our photos in a fairly low light surround. This means that we don't need to crank up the brandish brightness. Setting a high display brightness means images looks brighter when editing than they might actually be, and is a mutual reason that prints wait darker than the image on screen.
Of course, we don't all happen to have a photograph editing dungeon, and Datacolor has factored this in. The Spyder X has an ambient light sensor, so information technology tin find how much light there is in your surroundings. It can use this during calibration, and besides to adjust the brightness of your screen on a daily ground as light levels change in your room.
Whether or not you detect this useful is upwardly to you of form. If you lot are in a working environment with fairly abiding lighting levels, this may not be a needed. However, if y'all have a working space which is well lit during the mean solar day, and darker at nighttime, then this volition definitely come in useful.
You can configure whether or not the device sets upwards monitor profiles for different ambient lighting conditions in the calibration settings, under the Room Light and Brightness settings.
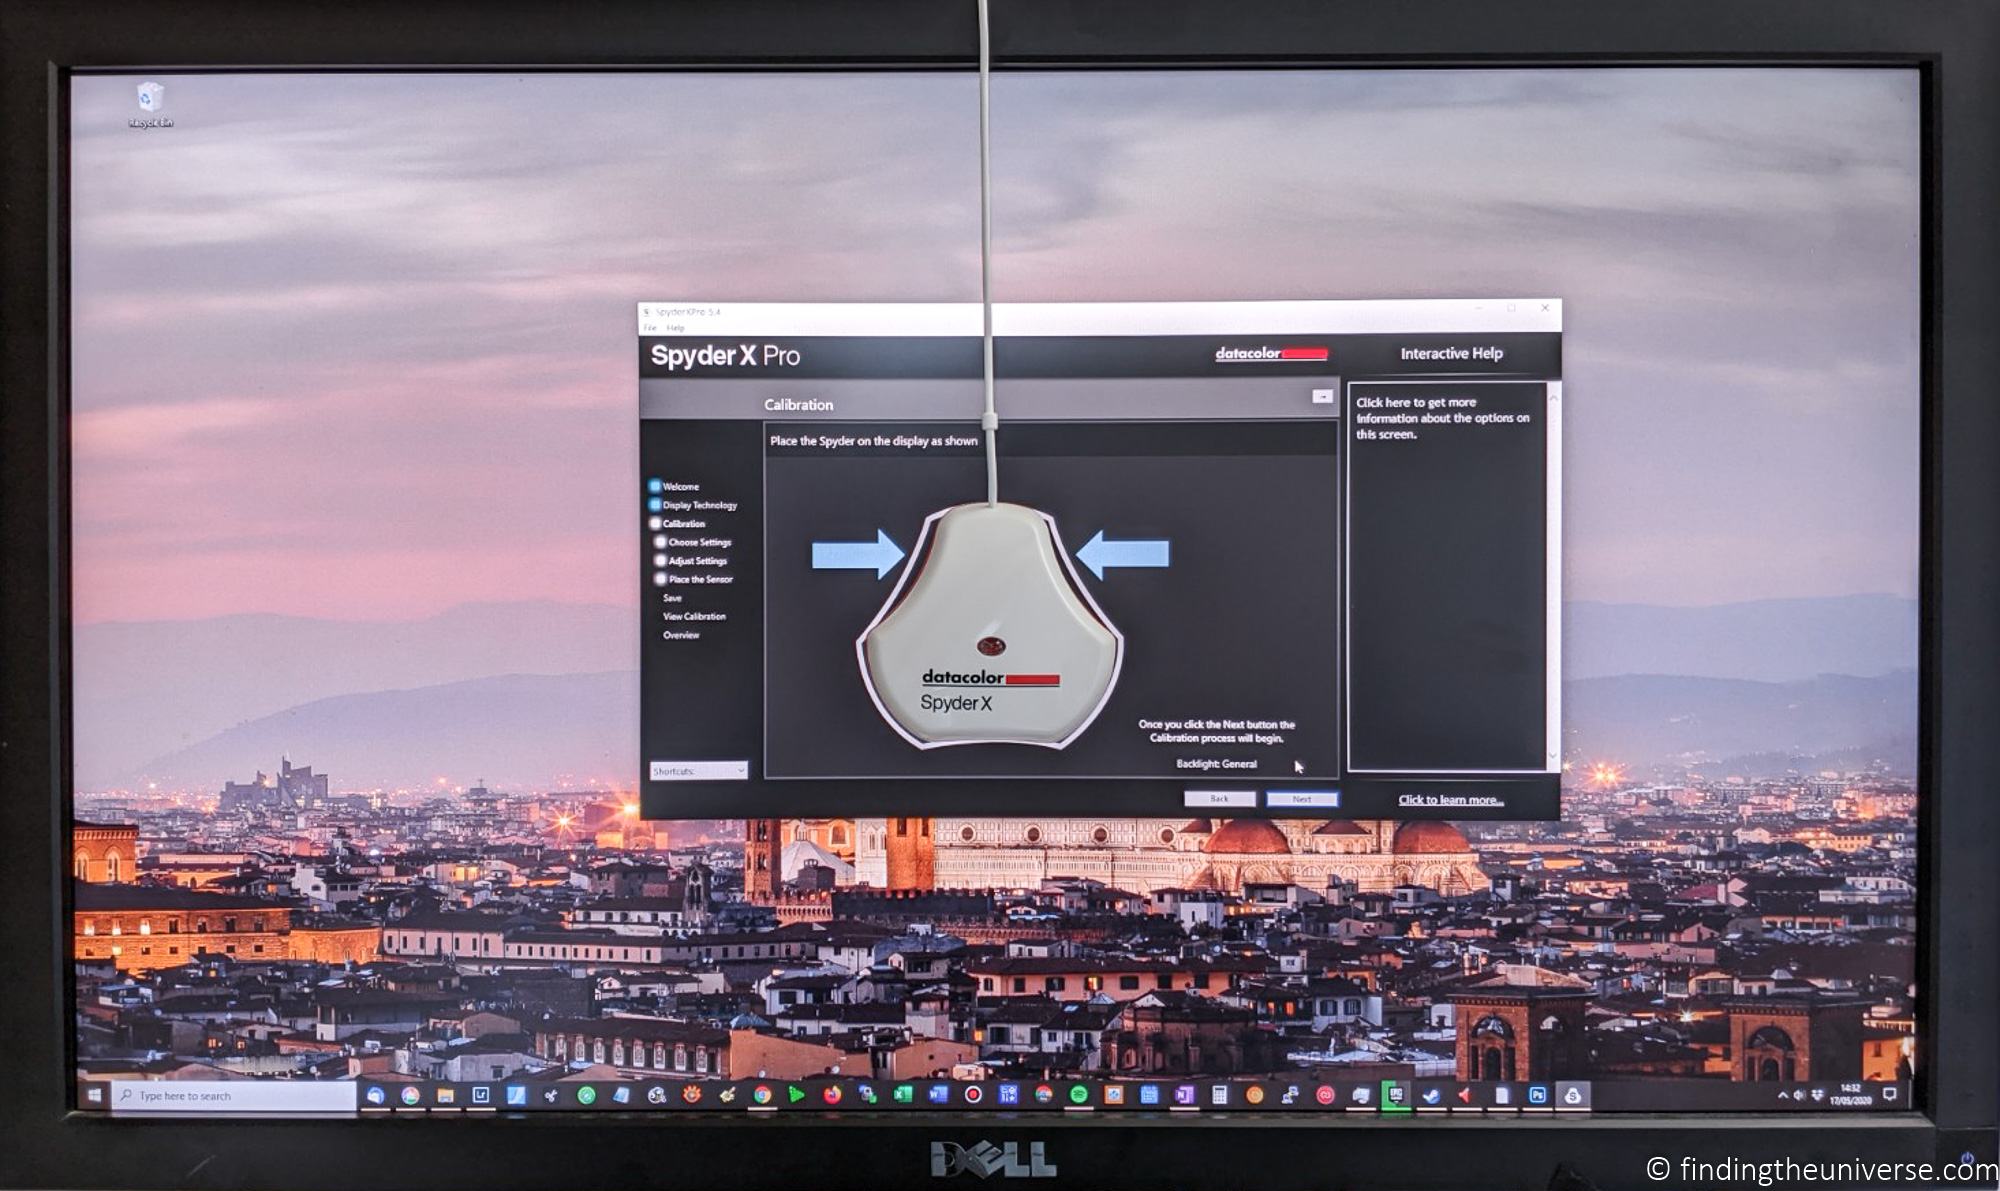
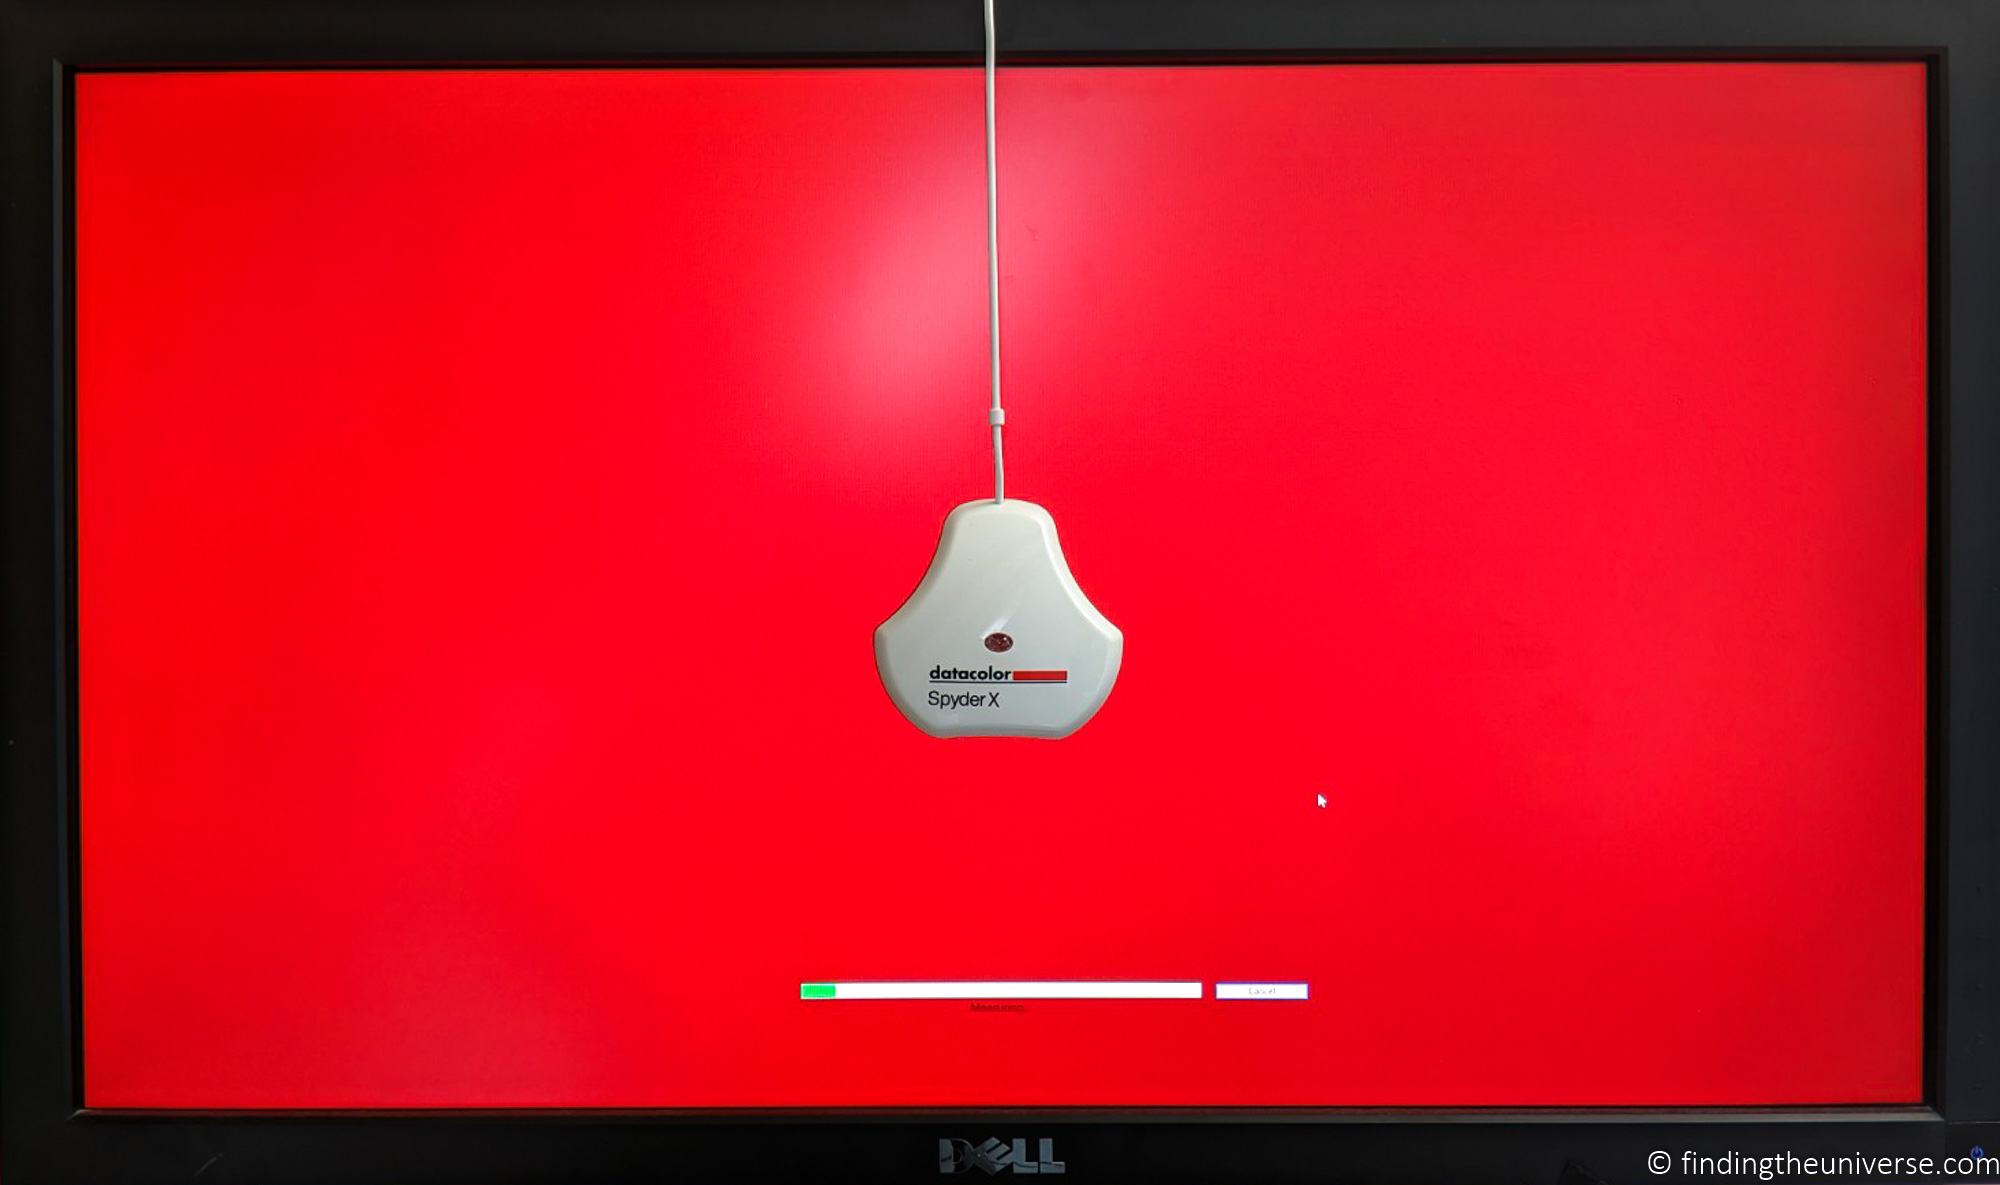
Once you have everything set, the tool will identify itself in the centre of the screen, and testify you lot where to place the Spyder. A tip – the Spyder needs to be flat against the screen, not dangling. If you take an external monitor, you volition likely demand to tip it dorsum a bit to get the Spyder to prevarication flat. A laptop screen is a lot easier to work with equally it tilts easily.
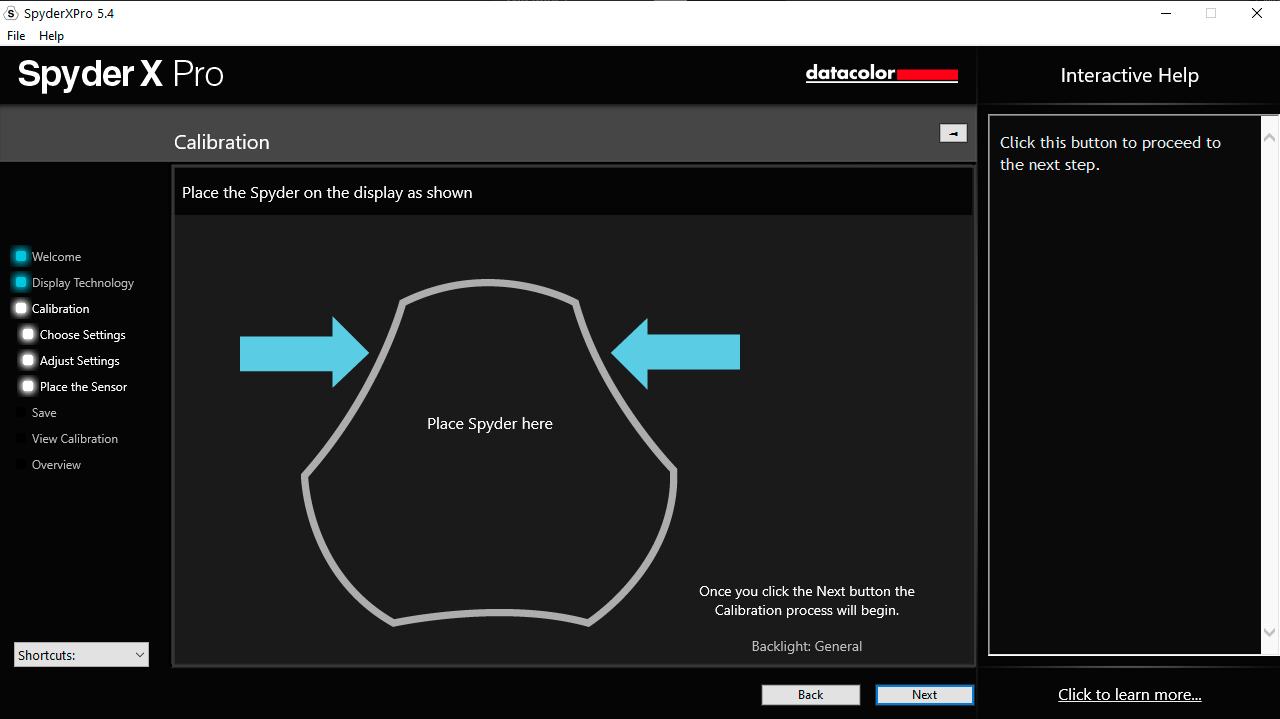
Once you have the SpyderX placed, you tin can commencement the calibration procedure. This is quite hands off, with the exception that y'all will be prompted to adjust the brightness. Otherwise, it just flashes pretty colors.
When information technology is done, it changes the color contour your computer uses and lets yous ready a name for it. It likewise shows some case images you tin can employ to see how the profiling turned out. At this bespeak you will accept the option to toggle a earlier and after version of your screen calibration, and apply the examination image provided to see the departure.
At this point in the calibration, the screen may announced to exist more bluish or more xanthous than you lot are used to. This is non unusual – if you have been using a poorly calibrated monitor, your eyes volition have adjusted to this every bit normal.
Yet, ambient calorie-free and other factors can also affect how you perceive white, and it will exist a jarring experience if you work in quite a warmly lit room yet take your monitor set to a cool color. Personally, I take this state of affairs, and I found the default 6,500K that the Spyder X used to be also bluish for my personal setup. So I ran through the calibration again, with a target white betoken of 5,000K. This yielded an first-class result for my setup and situation.
Another thing you might notice later calibration is that colors in color managed applications are a niggling bit more muted than you are used to. Many monitors and displays ship with relatively loftier levels of saturation, which is not realistic.
Once you have things where you want them to be, you tin cheque how your monitor performs in a number of tests, including what gamut it is capable of displaying. Ideally you want information technology to be effectually 100% of sRGB at a minimum. If you take a wide gamut monitor, you want it to be over 100% of sRGB, and covering more of the Adobe RGB gamut.
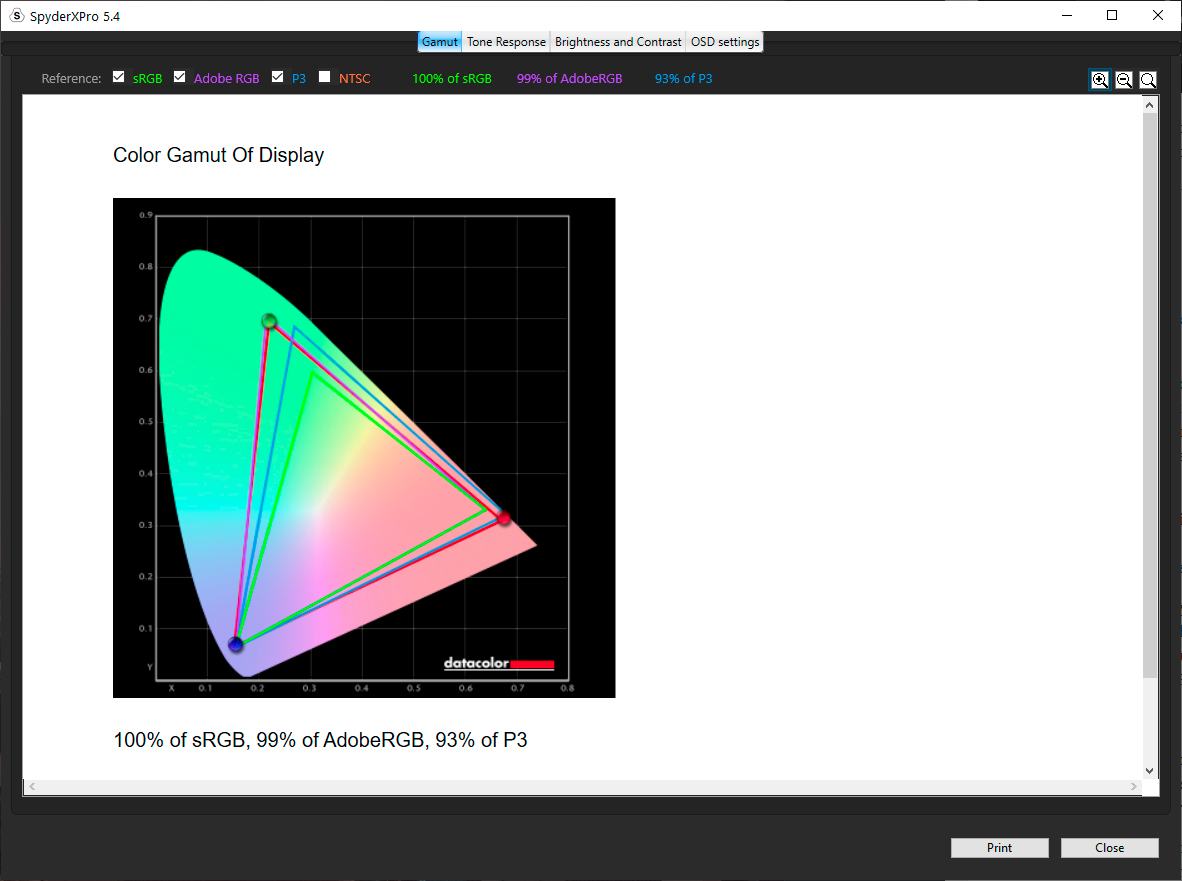
As you can come across, after calibration, the monitor I am using achieves 100% of sRGB and shut to 100% Adobe RGB.
I constitute the Spyder Ten Pro to be an fantabulous bit of kit that finally let me properly adapt my monitor for accurate colors. Information technology's easy to utilise, and I like that it has the room low-cal monitoring feature, pregnant it stays useful even in between scale sessions.
In summary, if you are looking to calibrate your monitor, a hardware tool like the Spyder Ten Pro is going to exist the best choice. You tin definitely get results with a software calibration tool, but these are unlikely to be particularly accurate.
If you want your prints to match your screen, and to have color accurate images in full general, I would recommend the Spyder X Pro as a fast and easy to use solution. It'south available straight from Spyder here, and on Amazon here.
How to Share Your Photos
Now you take a fully calibrated monitor. Your photos on screen should be accurate to how they will appear on impress, and on other calibrated monitors. At this point you might be y'all might exist wondering the best way to share your images with other people so you tin can exist sure they meet them as they should be seen.
This is particularly the case if you are selling your photos of an event like a wedding ceremony, where you desire your clients to get an accurate preview of what they are buying.
You have a few options.
The two best options would exist to transport client bodily proofs of the prints, printed out for review. Of class, this is going to incur a price, which yous might have to consider. Another choice is to have them review the photos at your studio, or to bring your ain colour managed laptop with you lot to somewhere you can show them. This style you know they volition see them on a properly color managed screen, so there are no surprises.
If the above options are not possible, then consider putting together some tips on the best viewing conditions for the images you ship them digitally. Perchance suggest they view them in a darker room, with their screen brightness turned downwards. You might too advise if they have control over saturation, to reset this to a "natural" setting or like if this is an option.
Further Reading
Well, hopefully this post answered all your monitor calibration questions. Earlier you lot head off, I wanted to share some more than photography tips and advice that I've put together in the years of running this site.
- We take a guide tohow to apply a compact camera,how to employ a DSLR camera, andhow to employ a mirrorless camera. We also have a guide tohow a DSLR works
- Knowing how to compose a bully photo is a key photography skill. Encounter our guide tolimerick in photography for lots of tips on this subject
- We have a guide to whatdepth of field is and when y'all would want to use it.
- We are big fans of getting the virtually out of your digital photo files, and do to that you will need to shoot in RAW. See our guide toRAW in photography to understand what RAW is, and why yous should switch to RAW as soon as yous can if your camera supports information technology.
- Nosotros have a guide to the best photograph editing software, as well as a guide to the best laptops for photograph editing for some tips on what to expect for.
- If you lot're looking for more than advice on specific tips for different scenarios, nosotros also have y'all covered. See our guide toNorthern Lights photography,long exposure photography,fireworks photography,tips for taking photos of stars, andcold weather photography.
- If yous're looking for a great gift for a photography loving friend or family member (or yourself!), take a look at ourphotography gift guide,
- If yous're in the market for a new camera, we have a detailed guide to thebest travel cameras, as well as specific guides for theall-time cameras for hiking and backpacking, thebest meaty camera,best mirrorless camera andbest DSLR photographic camera. We also have a guide to thebest camera lenses.
- If y'all desire a camera or lens, but the prices are a bit high, encounter our guide towhere to buy used cameras and camera gear for some upkeep savings options.
- We have a guide towhy you demand a tripod, a guide tochoosing a travel tripod, and a circular-upward of the all-time travel tripods
Looking to Improve Your Photography?
If you found this post helpful, and you desire to better your photography overall, yous might want to check out myonline travel photography course.
Since launching the form in 2016, I've already helped over 2,000 students learn how to take meliorate photos. The class covers pretty much everything yous demand to know, from the basics of how a camera works, through to composition, low-cal, and photo editing.
It also covers more than advanced topics, including astrophotography, long exposure photography, wink photography, and HDR photography.
Y'all get feedback from me equally yous progress through assignments, access to webinars, interviews and videos, likewise as sectional membership of a Facebook group where you can get feedback on your work and take office in regular fun photo challenges.
Information technology's bachelor for an amazing one-off price for lifetime admission, and I recollect you lot should check it out. Which you can practice pastclicking here.
And that'south it for our guide to monitor calibration! If you take whatever questions or feedback, I'm here to heed and do my all-time to answer. Just pop them in the comments below and I'll get back to you lot as soon as I can.

Datacolor Spyder 4 Software Download Mac
Posted by: spangleraborted.blogspot.com

